Search This Blog

Tuesday 25 October 2016

How to Login Single user mode in Boot Grub

Kernel Selection menu, press e to modify the parameters to boot the kernel.

centos7 single user mode 1

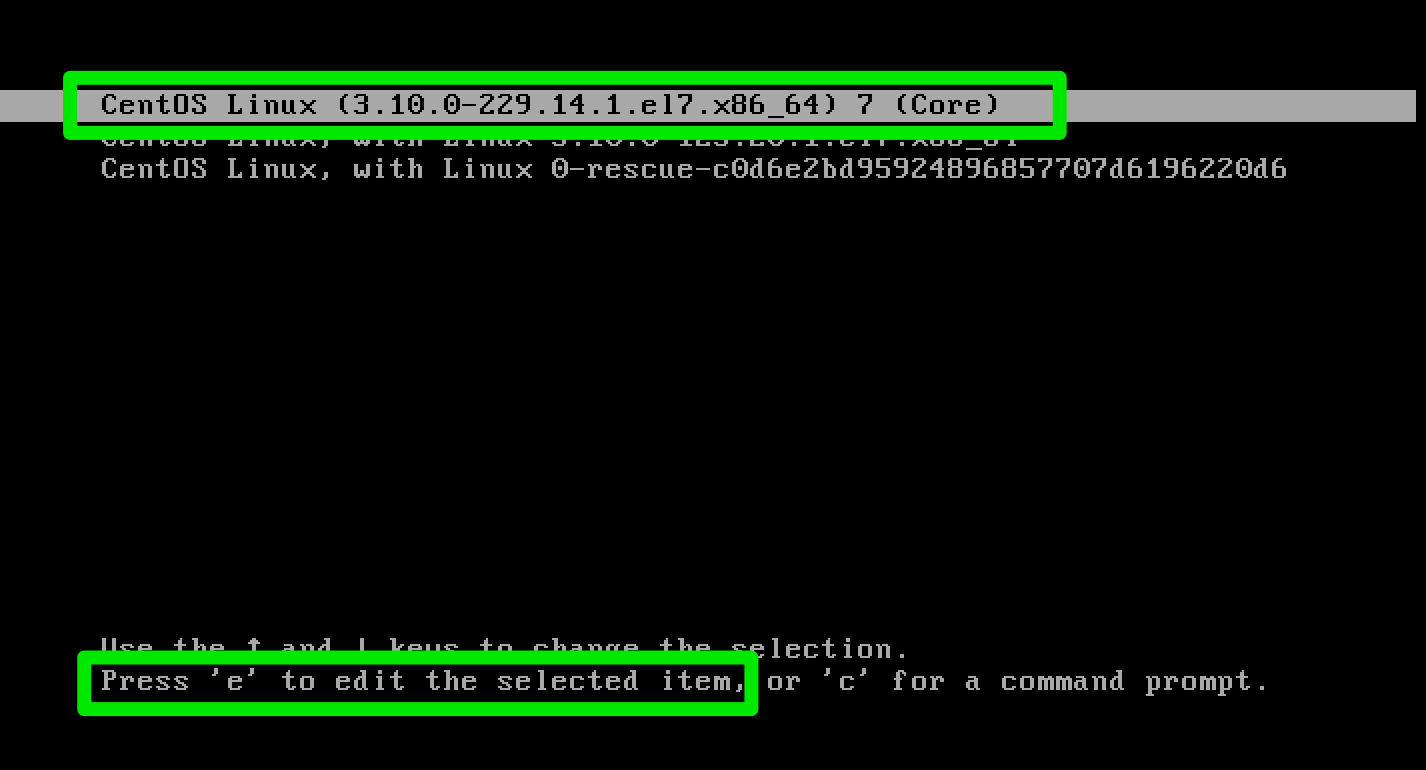
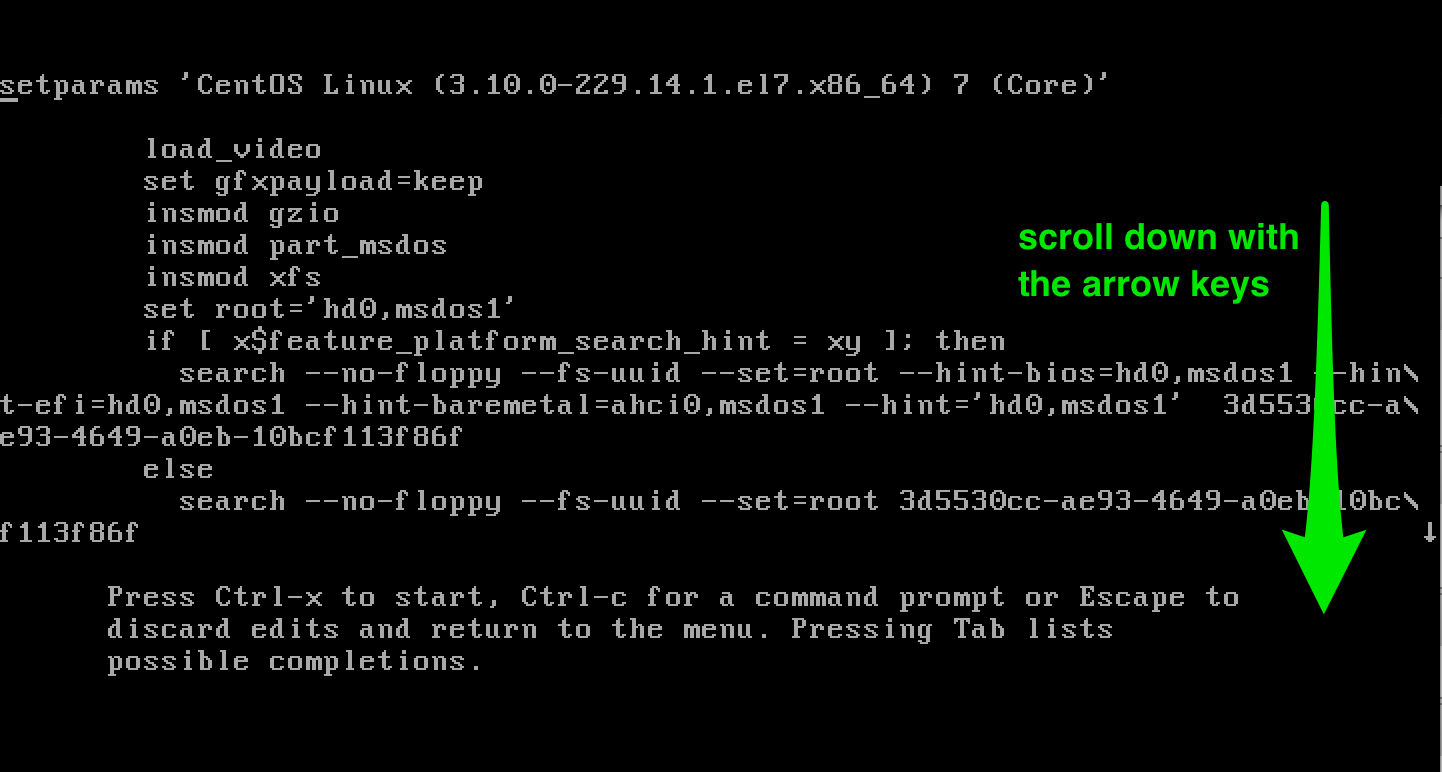
The next screen will show you a confusing screen of kernel parameters. It'll look like this.

centos7 single user mode 2

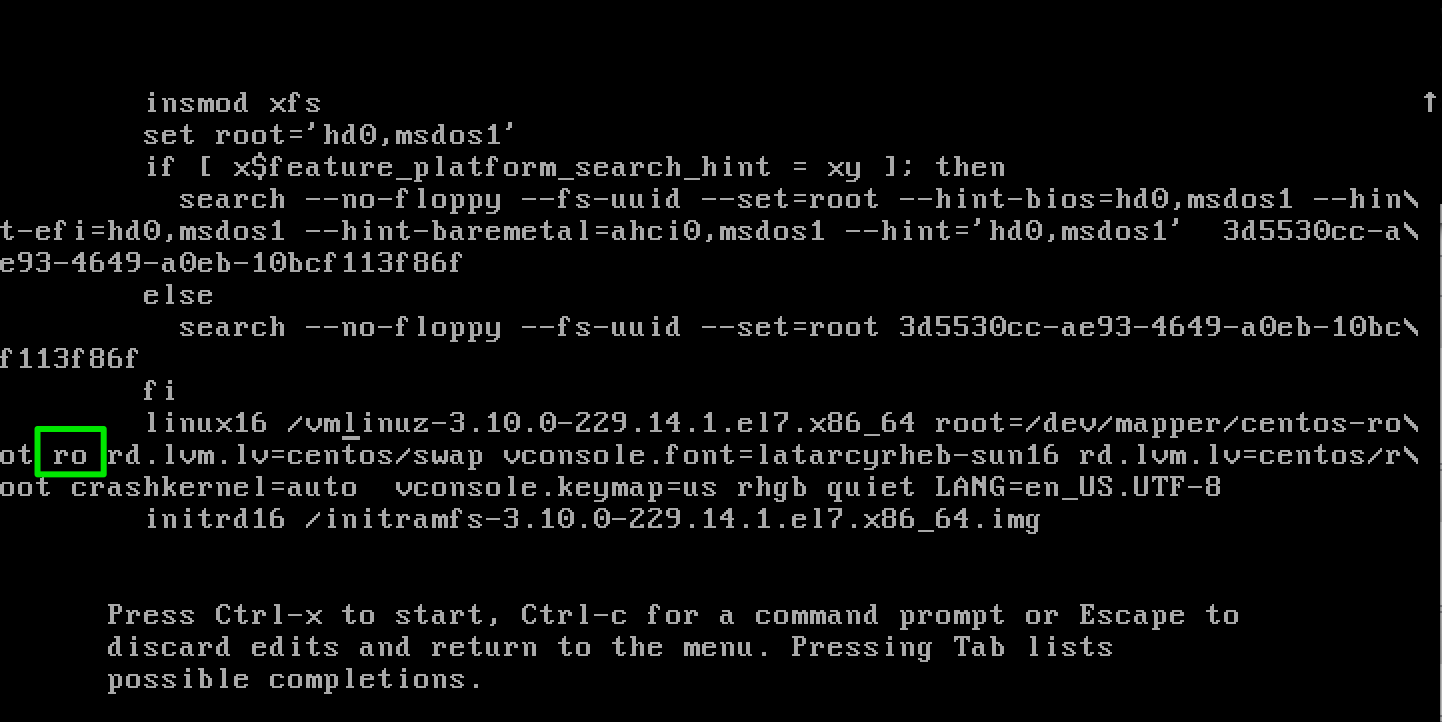
Scroll down until you find the actual kernel line. It starts with linux16 /vmlinuz-... and will span a couple of lines. You're now looking for the ro keyword in the kernel linux, which would start the OS with a read only (ro) file system.

centos7 single user mode 3

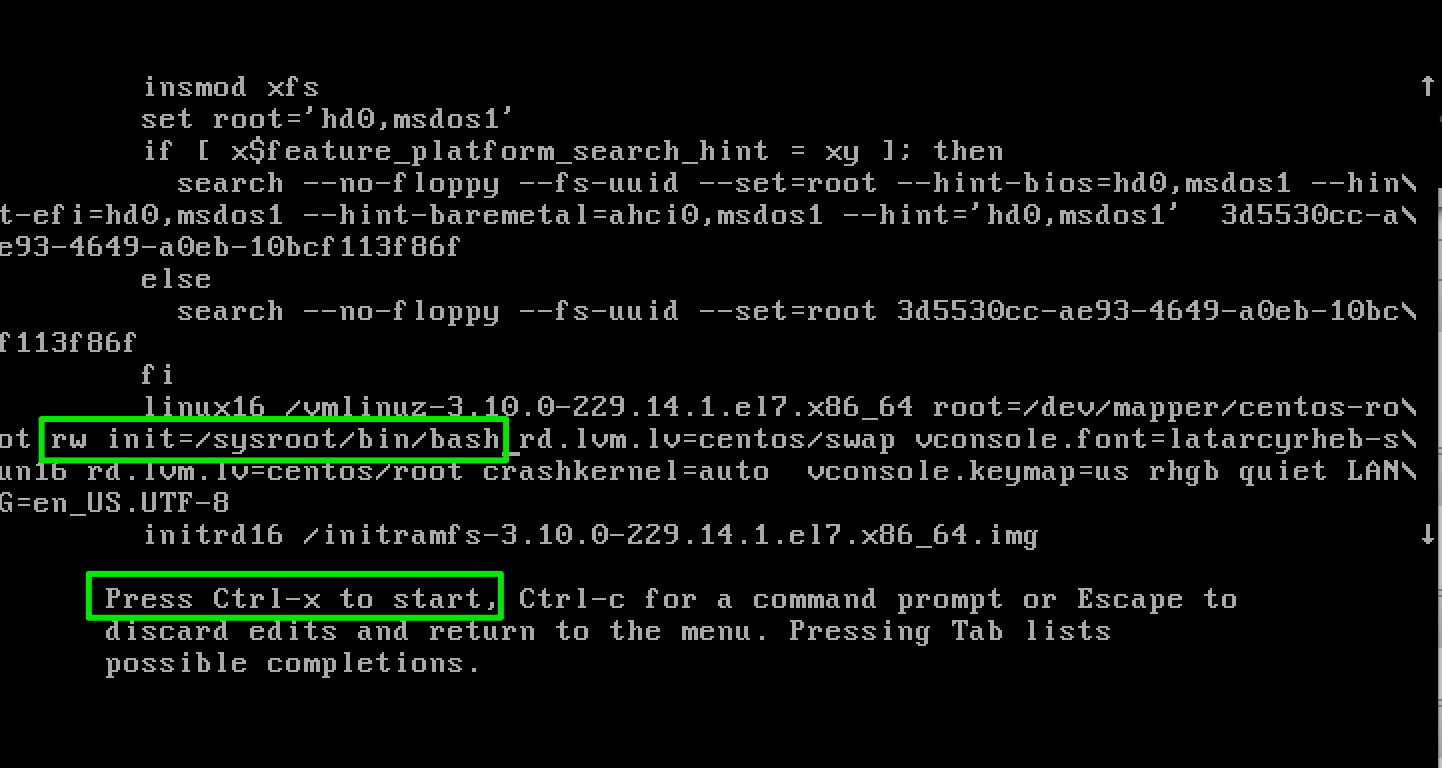
Use your arrow keys to go to the ro line and replace it with rw init=/sysroot/bin/bash. The result should look like this. If that's the case, press ctrl+x to boot the kernel with those options.

centos7 single user mode 4

If everything went fine, you're now in a limited shell with access to the entire filesystem. To make things easier, you can chroot the filesystem so you can access all your known files/directories with the same paths.

centos7 single user mode 5

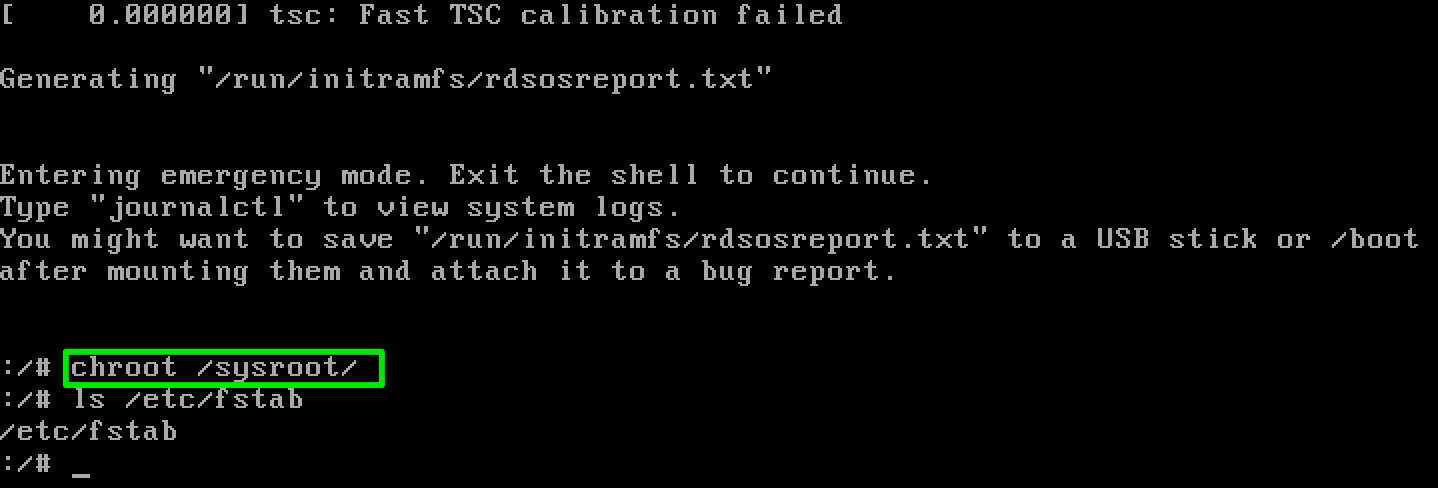
After you typed chroot /sysroot/, you'll find your familiar files in /etc, /usr,/var, ...

If you're done working in single user mode, reboot again by pressing ctrl+alt+del.

Update: as a reader pointed out, you may have to remount the filesystem from readonly to read-write, too.

mount -o remount,rw /

After that, you should be able to make changes to files on the disk that persist on reboot.


How to Set default runlevel in CentOS 7 / RHEL 7

In CentOS 7 / RHE 7,  systemd uses "targets" instead of run-levels.  /etc/inittab is no more used by systemd to change the run levels.

This guide will help you to set up default runlevel in CentOS 7 / RHEL 7.

Default runlevel can be set either by using the systemctl command or making symbolic link of runlevel targets to default target file.

rm '/etc/systemd/system/default.target'
ln -s '/usr/lib/systemd/system/multi-user.target' '/etc/systemd/system/default.target'

Check the current level.

# systemctl get-default 
multi-user.target

Before making the symbolic link, lets list out the files in the systemd directory.

# ls /lib/systemd/system/runlevel*target -l

Output will look like below.

lrwxrwxrwx. 1 root root 15 Aug  3 13:44 /lib/systemd/system/runlevel0.target -> poweroff.target  lrwxrwxrwx. 1 root root 13 Aug  3 13:44 /lib/systemd/system/runlevel1.target -> rescue.target  lrwxrwxrwx. 1 root root 17 Aug  3 13:44 /lib/systemd/system/runlevel2.target -> multi-user.target  lrwxrwxrwx. 1 root root 17 Aug  3 13:44 /lib/systemd/system/runlevel3.target -> multi-user.target  lrwxrwxrwx. 1 root root 17 Aug  3 13:44 /lib/systemd/system/runlevel4.target -> multi-user.target  lrwxrwxrwx. 1 root root 16 Aug  3 13:44 /lib/systemd/system/runlevel5.target -> graphical.target  lrwxrwxrwx. 1 root root 13 Aug  3 13:44 /lib/systemd/system/runlevel6.target -> reboot.target

As per the previous step, current default run level 3. Issue the following command to make symbolic link of runlevel5.target to default.target file.

# ln -sf /lib/systemd/system/runlevel5.target /etc/systemd/system/default.target

or

# ln -sf /lib/systemd/system/graphical.target /etc/systemd/system/default.target

Again check the current level.

# systemctl get-default  runlevel5.target

Now the default runlevel is 5 (graphical mode), reboot the server and check it out.

# reboot

[Error] md5-x86_64.s:" ": Error: " " out range of signed 32bit displacement

Error:
md5-x86_64.s: Assembler messages:
md5-x86_64.s:41: Error: 0xd76aa478 out range of signed 32bit displacement
md5-x86_64.s:50: Error: 0xe8c7b756 out range of signed 32bit displacement
md5-x86_64.s:68: Error: 0xc1bdceee out range of signed 32bit displacement
md5-x86_64.s:77: Error: 0xf57c0faf out range of signed 32bit displacement
md5-x86_64.s:95: Error: 0xa8304613 out range of signed 32bit displacement
md5-x86_64.s:104: Error: 0xfd469501 out range of signed 32bit displacement
md5-x86_64.s:122: Error: 0x8b44f7af out range of signed 32bit displacement
md5-x86_64.s:131: Error: 0xffff5bb1 out range of signed 32bit displacement
md5-x86_64.s:140: Error: 0x895cd7be out range of signed 32bit displacement
md5-x86_64.s:158: Error: 0xfd987193 out range of signed 32bit displacement
md5-x86_64.s:167: Error: 0xa679438e out range of signed 32bit displacement
md5-x86_64.s:187: Error: 0xf61e2562 out range of signed 32bit displacement
md5-x86_64.s:196: Error: 0xc040b340 out range of signed 32bit displacement
md5-x86_64.s:214: Error: 0xe9b6c7aa out range of signed 32bit displacement
md5-x86_64.s:223: Error: 0xd62f105d out range of signed 32bit displacement
md5-x86_64.s:241: Error: 0xd8a1e681 out range of signed 32bit displacement
md5-x86_64.s:250: Error: 0xe7d3fbc8 out range of signed 32bit displacement
md5-x86_64.s:268: Error: 0xc33707d6 out range of signed 32bit displacement
md5-x86_64.s:277: Error: 0xf4d50d87 out range of signed 32bit displacement
md5-x86_64.s:295: Error: 0xa9e3e905 out range of signed 32bit displacement
md5-x86_64.s:304: Error: 0xfcefa3f8 out range of signed 32bit displacement
md5-x86_64.s:322: Error: 0x8d2a4c8a out range of signed 32bit displacement
md5-x86_64.s:332: Error: 0xfffa3942 out range of signed 32bit displacement
md5-x86_64.s:340: Error: 0x8771f681 out range of signed 32bit displacement
md5-x86_64.s:356: Error: 0xfde5380c out range of signed 32bit displacement
md5-x86_64.s:364: Error: 0xa4beea44 out range of signed 32bit displacement
md5-x86_64.s:380: Error: 0xf6bb4b60 out range of signed 32bit displacement
md5-x86_64.s:388: Error: 0xbebfbc70 out range of signed 32bit displacement
md5-x86_64.s:404: Error: 0xeaa127fa out range of signed 32bit displacement
md5-x86_64.s:412: Error: 0xd4ef3085 out range of signed 32bit displacement
md5-x86_64.s:428: Error: 0xd9d4d039 out range of signed 32bit displacement
md5-x86_64.s:436: Error: 0xe6db99e5 out range of signed 32bit displacement
md5-x86_64.s:452: Error: 0xc4ac5665 out range of signed 32bit displacement
md5-x86_64.s:463: Error: 0xf4292244 out range of signed 32bit displacement
md5-x86_64.s:481: Error: 0xab9423a7 out range of signed 32bit displacement
md5-x86_64.s:490: Error: 0xfc93a039 out range of signed 32bit displacement
md5-x86_64.s:508: Error: 0x8f0ccc92 out range of signed 32bit displacement
md5-x86_64.s:517: Error: 0xffeff47d out range of signed 32bit displacement
md5-x86_64.s:526: Error: 0x85845dd1 out range of signed 32bit displacement
md5-x86_64.s:544: Error: 0xfe2ce6e0 out range of signed 32bit displacement
md5-x86_64.s:553: Error: 0xa3014314 out range of signed 32bit displacement
md5-x86_64.s:571: Error: 0xf7537e82 out range of signed 32bit displacement
md5-x86_64.s:580: Error: 0xbd3af235 out range of signed 32bit displacement
md5-x86_64.s:598: Error: 0xeb86d391 out range of signed 32bit displacement
make[2]: *** [md5-x86_64.o] Error 1
make[2]: Leaving directory `/opt/openssl-0.9.8e/crypto/md5'
make[1]: *** [subdirs] Error 1
make[1]: Leaving directory `/opt/openssl-0.9.8e/crypto'
make: *** [build_crypto] Error 1

Solution: For a quick fix try recompiling with the no-asm option.
It's a problem with the addressing in the assembly code.
cd
<openssl-source-directory>
./config no-asm make && make install

Friday 21 October 2016

Linux Watch command with result of multiple commands

watch "free -h && df -h"
 
Enclosed command with Double quotes.

TFS Unlock the files checked out by other users

It can be done from Administrator privilege login/workspaces to undo changes for another user.

One option is to use the TF.exe command – line tool as provided below:

C:\Program Files (x86)\Microsoft Visual Studio 10.0\Common7\IDE

tf.exe undo "$/MyProject/VersionX/Utils/file.cs" /workspace:MyWorkspace;Domain\User/collection:http://server:8080/tfs/Collection/recursive

Another option is to use the Team Foundation Power Tools by following the steps provided below:

1. Open Source Control Explorer.

2. Right – click the item on which checkout is to be undone (or a parent folder of multiple files to be undone).

3. Select Find in Source Control ➪ Status.  (If Find in Source Control option is not available in Visual studio,install TFS power tools)

4. In the Find in Source Control dialog, leave the Status check box marked.

5. Enter the value for the path as "$/MyProject/VersionX/Utils"

6.Either enter a value for the Wildcard text box or enter a username in the " Display files checked out to " text box and select that radio button.

7. Click Find and Select the items to undo and  Right – click and select Undo.

8. Click Yes when prompted with " Undo all selected changes? "


How to add “Reopened” status to Bugzilla

You might be looking for 'Bug status Workflow' option in Administration.

There you can select all the options that you want as per your defect workflow.

Usually, 'REOPENED' status comes visible when a bug is 'CLOSED' so you can check the 'REOPENED' and it will display the status for Bug Status.

– Select Administration option from the Home Page (Considering you logged in successfully)

– Select Field Values –> Status

– Select Add option for Adding a new status (e.g. REOPENED or CLOSED)

– Now you can see the new field in the Status table

– Again select Administration from Home page

– Select 'Bug Status Workflow' option and change the flow as needed.

– you can see your new added status in the bug then.


Sunday 16 October 2016

ORA-00845: MEMORY_TARGET not supported on this system

​This is a very common error which you might face while starting up your oracle database.

This happens when your system is out of temporary storage. While starting up the database oracle uses /dev/shm to store temporary files but when it runs out of memory you get this error.


Error:sql> startup
ORA-00845: MEMORY_TARGET not supported on this system

Reason:
/dev/shm is also know as tmpfs i.e. temporary file system which keeps all the file system in virtual memory to speed up several processes.

Solution:
Increase the size of /dev/shm

To check the size of /dev/shm
# df -h
Filesystem    Size   Used  Avail  Use%  Mounted on
/dev/sda3     7.6G   4.4G  2.9G  61%    /
tmpfs         504M   76K   504M  1%     /dev/shm
/dev/sda1     194M   25M   160M   14%   /boot

To increase the size
# mount -o remount,size=3G /dev/shm
Verify the size
# df -h
Filesystem   Size   Used   Avail  Use%  Mounted on
/dev/sda3   7.6G    4.4G   2.9G   61%   /
tmpfs       3G      1007M  2.1G   33%   /dev/shm
/dev/sda1   194M    25M    160M   14%   /boot

To make permanent changes to your file system update your fstab
# vi /etc/fstab
tmpfs  /dev/shm  tmpfs  defaults,size=3G  0 0

Update the new fstab file
# mount -a

Friday 14 October 2016

Error occurred while starting the IBM launchpad due to firefox version incompatible


1) Download an 10 version of Firefox, for example:

# cd /tmp

2) Extract it:

# cd /tmp
# tar -jxf firefox-10.0.2.tar.bz2

3) Tell Launchpad to use it

# export BROWSER=/tmp/firefox/firefox

4) Relaunch launchpad.sh

# /tmp/omni-install/launchpad.sh

and now it works:

Thursday 13 October 2016

GCC and G++ -4.8 installation in Ubuntu 12.04

Version of gcc, for 12.04, is 4.8.1 and is available in the toolchain PPA.

Adding the toolchain/test PPA:

To add the PPA to your system, open a terminal(Ctrl+Alt+t) and run the following commands:

sudo apt-get install python-software-properties  sudo add-apt-repository ppa:ubuntu-toolchain-r/test  sudo apt-get update  sudo apt-get install gcc-4.8 g++-4.8  sudo update-alternatives --install /usr/bin/gcc gcc /usr/bin/gcc-4.8 50  
If you need gcc-4.8 on 12.04 now, your only option is to build it from source.

Please read the GCC installation FAQ prior to installation.

You can download gcc-4.8 from one of gnu.org's mirror sites or directly from their SVN server.

Here is an example of steps to compile from source (see here for additional details.) Note that these may vary depending on your system and preferences.

  1. Download the source code

  2. Install some additional libraries (sudo apt-get install libgmp-dev libmpfr-dev libmpc-dev libc6-dev)

  3. Compile the source: ./gcc-4.8.0/configure --prefix=/app/gcc/4.8.0
  4. Run make (This will take some time to complete. Go make some coffee, or bake some cookies. ;-))
  5. Install the code: sudo make install

Once this process has completed, run the command gcc --version to verify that the installation has completed successfully. You should see something similar to the following output:

getmefollks@kickyou:~$ gcc --version  gcc (Linaro 4.8.0) 4.8.0  Copyright (C) 2013 Free Software Foundation, Inc.  This is free software; see the source for copying conditions.  There is NO  warranty; not even for MERCHANTABILITY or FITNESS FOR A PARTICULAR PURPOSE.  

Wednesday 12 October 2016

USB Keyboard and Mouse not working in Ubuntu Desktop Version.

Reinstall input device drivers
sudo apt-get install xserver-xorg-input-all

sudo apt-get update


Oracle user creation script

1) Enable the script execution:

Alter session set "_ORACLE_SCRIPT"=true;

2) User creation script with required privileges:

create user TestUser identified by TestUser;
grant connect , resource to TestUser ;
grant query rewrite to TestUser ;
grant create table to TestUser ;
grant create procedure to TestUser ;
grant create sequence to TestUser ;
grant create synonym to TestUser ;
grant create trigger to TestUser ;
grant create type to TestUser ;
grant create view to TestUser ;

grant connect, resource, create view, create public synonym to TestUser
with admin option;


grant alter any role, alter any sequence, alter any table, alter tablespace,
alter any trigger, comment any table, create any sequence, create any table,
create any trigger, create role, create tablespace, create user, drop any
sequence, drop any table, drop any trigger, drop tablespace, drop user, drop
any role, grant any role, insert any table, select any table, update any
table to TestUser;


Sunday 9 October 2016

Install the Team Foundation Server Plug-in for Eclipse

​After making sure your computer meets all the prerequisites, you're ready to install the plug-in.

To install the plug-in

  1. Open Eclipse.

  2. On the Help menu, choose Install New Software.

    The Install dialog box appears.

    Install Team Explorer Everywhere

    The install wizard looks slightly different for different versions of Eclipse.

  3. Choose Add.

    The Add Repository dialog box appears.

    Add site
  4. In Name, enter TFS Plugin for Eclipse.

  5. In Location, enter http://dl.microsoft.com/eclipse/tfs, and then choose OK.

  6. In the list of features in the Install dialog box, select the check box that corresponds to Team Explorer Everywhere, and then choose Next two times.

    Available Software
    Note Note

    Make sure to clear Contact all update sites during install to find required software if you just want to install Team Explorer Everywhere at this time.

  7. Accept the Microsoft Software License Terms, and then choose Finish.

    Review licenses
  8. Restart Eclipse when prompted.


Tuesday 4 October 2016

How to change default text editor in Linux


sudo update-alternatives --config editor

Note:NANO is the default text editor. Prefer to have vim.
For example:

There are 4 choices for the alternative editor (providing /usr/bin/editor).

  Selection    Path                Priority   Status
------------------------------------------------------------
  0            /bin/nano                   40        auto mode
  1            /bin/ed                    -100        manual mode
  2            /bin/nano                   40        manual mode
* 3            /usr/bin/vim.basic     30         manual mode
  4            /usr/bin/vim.tiny       10         manual mode

Press <enter> to keep the current choice[*], or type selection number: ​

How to clear Linux buffer and cache space

If you ever want to empty it you can use this chain of commands.

[root@test ~]# free -m && sync && echo 3 > /proc/sys/vm/drop_caches && free -m
total used free shared buffers cached
Mem: 5855 4469 1385 0 21 952
-/+ buffers/cache: 3495 2360
Swap: 4095 50 4045
total used free shared buffers cached
Mem: 5855 4412 1442 0 0 917
-/+ buffers/cache: 3493 2361
Swap: 4095 50 4045

You can signal the Linux Kernel to drop various aspects of cached items by changing the numeric argument to the above command.

  • To free pagecache:

    # echo 1 > /proc/sys/vm/drop_caches  
  • To free dentries and inodes:

    # echo 2 > /proc/sys/vm/drop_caches  
  • To free pagecache, dentries and inodes:

    # echo 3 > /proc/sys/vm/drop_caches  

Non root users run with Sudo:

$ sudo sh -c 'echo 1 >/proc/sys/vm/drop_caches'  $ sudo sh -c 'echo 2 >/proc/sys/vm/drop_caches'  $ sudo sh -c 'echo 3 >/proc/sys/vm/drop_caches'  

NOTE: There's a more esoteric version of the above command if you're into that:

$ echo "echo 1 > /proc/sys/vm/drop_caches" | sudo sh  

Why the change in syntax? The /bin/echo program is running as root, because of sudo, but the shell that's redirecting echo's output to the root-only file is still running as you. Your current shell does the redirection before sudo starts.

Monday 3 October 2016

Openssl-0.9.8 for SAP HANA

​(1) Download openssl-0.9.8 source code from here, and uncompress it.

(2) To build dynamic library, you should add shared option when configuring:

./config shared  make  make install_sw  

(3) Because the default installation directory is /usr/local/ssl, to let SAP HANA find the openssl library, you should add/usr/local/ssl/lib into /etc/ld.so.conf file:

# cat /etc/ld.so.conf  /usr/local/ssl/lib  /usr/local/lib64  /usr/local/lib  include /etc/ld.so.conf.d/*.conf  # /lib64, /lib, /usr/lib64 and /usr/lib gets added  # automatically by ldconfig after parsing this file.  # So, they do not need to be listed.  

Then execute ldconfig command:

# ldconfig  

It is OK for installing SAP HANA now.