Search This Blog

Monday 23 May 2016

How to add Java environment variable on Linux.

root@kabali:~$ which java  /usr/bin/java

root@kabali:~$ ll /usr/bin/java lrwxrwxrwx 1 root root 22 2009-01-06 19:08 /usr/bin/java -> /etc/ alternatives/java

root@kabali:~$ ll /etc/alternatives/java lrwxrwxrwx 1 root root 36 2009-01-14 08:38 /etc/alternatives/java -> /usr/ lib/jvm/java-6-sun/jre/bin/java

root@kabali:~$ which javac /usr/bin/javac

root@kabali:~$ ll /usr/bin/javac lrwxrwxrwx 1 root root 23 2009-01-14 00:24 /usr/bin/javac -> /etc/ alternatives/javac

root@kabali:~$ ll /etc/alternatives/javac lrwxrwxrwx 1 root root 37 2009-01-14 08:25 /etc/alternatives/javac -> / usr/lib/jvm/java-6-openjdk/bin/javac
=================================================================================


Install new java location by following command:
 root@kabali:/usr/local/java/jdk1.8.0_05/jre#update-alternatives --install "/usr/bin/java" "java" "/usr/local/java/jdk1.8.0_05/bin/java" 1
root@kabali:/usr/local/java/jdk1.8.0_05/jre#update-alternatives --install "/usr/bin/javac" "javac" "/usr/local/java/jdk1.8.0_05/bin/javac" 1
root@kabali:/usr/local/java/jdk1.8.0_05/jre#update-alternatives --install "/usr/bin/javaws" "javaws" "/usr/local/java/jdk1.8.0_05/bin/javaws" 1ws

Set
root@kabali:/usr/local/java/jdk1.8.0_05/jre# update-alternatives --config java

There are 3 choices for the alternative java (providing /usr/bin/java).

Selection Path Priority Status
------------------------------------------------------------
* 0 /usr/lib/jvm/java-6-openjdk-amd64/jre/bin/java 1061 auto mode
1 /usr/lib/jvm/java-6-openjdk-amd64/jre/bin/java 1061 manual mode
2 /usr/lib/jvm/java-7-openjdk-amd64/jre/bin/java 1051 manual mode
3 /usr/local/java/jdk1.8.0_05/bin/java 1 manual

root@kabali:/usr/local/java/jdk1.8.0_05/jre# update-alternatives --config javac
There are 2 choices for the alternative javac (providing /usr/bin/javac).

Selection Path Priority Status
------------------------------------------------------------
* 0 /usr/lib/jvm/java-6-openjdk-amd64/bin/javac 1061 auto mode
1 /usr/lib/jdk1.8.0_05/bin/javac 1 manual mode
2 /usr/lib/jvm/java-6-openjdk-amd64/bin/javac 1061 manual mode

root@kabali:/usr/local/java/jdk1.8.0_05/jre# update-alternatives --config javaws
There are 3 choices for the alternative javaws (providing /usr/bin/javaws).

Selection Path Priority Status
------------------------------------------------------------
* 0 /usr/lib/jvm/java-6-openjdk-amd64/jre/bin/javaws 1061 auto mode
1 /usr/lib/jvm/java-6-openjdk-amd64/jre/bin/javaws 1061 manual mode
2 /usr/lib/jvm/java-7-openjdk-amd64/jre/bin/javaws 1060 manual mode
3 /usr/local/java/jdk1.8.0_05/bin/javaws 1 manual mode

root@kabali:/usr/local/java/jdk1.8.0_05/jre# java -version
java version "1.8.0_05"
Java(TM) SE Runtime Environment (build 1.8.0_05-b13)
Java HotSpot(TM) 64-Bit Server VM (build 25.5-b02, mixed mode)


Friday 20 May 2016

Resizing a LVM swap volume

  • swapoff /dev/vg_foo/lv_swap
  • lvextend -L+100M /dev/vg_foo/lv_swap
  • mkswap /dev/vg_foo/lv_swap
  • swapon /dev/vg_foo/lv_swap

Friday 13 May 2016

samba_selinux

NAME         samba_selinux - Security Enhanced Linux Policy for Samba    DESCRIPTION         Security-Enhanced Linux secures the Samba server via flexible mandatory         access control.    FILE_CONTEXTS         SELinux requires files to have an extended attribute to define the file         type.   Policy  governs the access daemons have to these files.  If you         want to share files other than home directories, those  files  must  be         labeled samba_share_t.  So if you created a special directory /var/eng,         you would need to label the directory with the chcon tool.           chcon -t samba_share_t /var/eng           To make this change permanent (survive a  relabel),  use  the  semanage         command to add the change to file context configuration:           semanage fcontext -a -t samba_share_t "/var/eng(/.*)?"         This  command  adds the following entry to /etc/selinux/POLICYTYPE/con‐         texts/files/file_contexts.local:           /var/eng(/.*)? system_u:object_r:samba_share_t:s0           Run the restorecon command to apply the changes:           restorecon -R -v /var/eng/    SHARING FILES         If you want to share files with multiple domains (Apache,  FTP,  rsync,         Samba),  you can set a file context of public_content_t and public_con‐         tent_rw_t.  These context allow any of the above domains  to  read  the         content.   If  you want a particular domain to write to the public_con‐         tent_rw_t   domain,   you   must   set   the    appropriate    boolean.         allow_DOMAIN_anon_write.  So for samba you would execute:           setsebool -P allow_smbd_anon_write=1    BOOLEANS         SELinux  policy  is customizable based on least access required.  So by         default SELinux policy turns off SELinux sharing  of  home  directories         and the use of Samba shares from a remote machine as a home directory.           If  you are setting up this machine as a Samba server and wish to share         the home directories, you need to set the samba_enable_home_dirs  bool‐         ean.                  setsebool -P samba_enable_home_dirs 1           If  you  want  to use a remote Samba server for the home directories on         this machine, you must set the use_samba_home_dirs boolean.                  setsebool -P use_samba_home_dirs 1           system-config-selinux is a GUI tool available to customize SELinux pol‐         icy settings.

Fdisk table update command without rebooting the system

[root@sharepoint usershare]# partx -v -a /dev/sda


Resolution

partprobe was commonly used in RHEL 5 to inform the OS of partition table changes on the disk. In RHEL 6, it will only trigger the OS to update the partitions on a disk that none of its partitions are in use (e.g. mounted). If any partition on a disk is in use, partprobe will not trigger the OS to update partitions in the system because it is considered unsafe in some situations.

So in general we would suggest:

  1. Unmount all the partitions of the disk before modifying the partition table on the disk, and then run partprobe to update the partitions in system.
  2. If this is not possible (e.g. the mounted partition is a system partition), reboot the system after modifying the partition table. The partitions information will be re-read after reboot.

If a new partition was added and none of the existing partitions were modified, consider using the partx command to update the system partition table. Do note that the partx command does not do much checking between the new and the existing partition table in the system and assumes the user knows what they are are doing. So it can corrupt the data on disk if the existing partitions are modified or the partition table is not set correctly. So use at one's own risk.

For example, a partition #1 is an existing partition and a new partition #2 is already added in /dev/sdb by fdisk. Here we use partx -v -a /dev/sdb to add the new partition to the system:

# ls /dev/sdb*    /dev/sdb  /dev/sdb1    

List the partition table of disk:

# partx -l /dev/sdb  # 1:        63-   505007 (   504945 sectors,    258 MB)    # 2:    505008-  1010015 (   505008 sectors,    258 MB)    # 3:         0-       -1 (        0 sectors,      0 MB)    # 4:         0-       -1 (        0 sectors,      0 MB)    

Read disk and try to add all partitions to the system:

# partx -v -a /dev/sdb                                           device /dev/sdb: start 0 size 2097152    gpt: 0 slices    dos: 4 slices    # 1:        63-   505007 (   504945 sectors,    258 MB)    # 2:    505008-  1010015 (   505008 sectors,    258 MB)    # 3:         0-       -1 (        0 sectors,      0 MB)    # 4:         0-       -1 (        0 sectors,      0 MB)    BLKPG: Device or resource busy  error adding partition 1  

(These last 2 lines are normal in this case because partition 1 is already added in the system before partition 2 is added)

Check that we have device nodes for /dev/sdb itself and the partitions on it:

# ls /dev/sdb*    /dev/sdb  /dev/sdb1  /dev/sdb2  

How to extend disk space linux guest vm without reboot in ESXI


To increase the size of your VMware Virtual Machine, you need to do 2 major steps. First, you need to increase the disk's size in your vSphere Client or through the CLI. This will increase the "hardware" disk that your Virtual Machine can see. Then, you need to utilize that extra space by partitioning it. If you're interested in just resizing your Linux LVM, please proceed to step 2.

1) Checking if you can extend the current disk or need to add a new one

This is rather important step, because a disk that has been partitioned in 4 primary partitions already can not be extended any more. To check this, log into your server and run fdisk -l at the command line.

# fdisk -l    Disk /dev/sda: 187.9 GB, 187904819200 bytes  255 heads, 63 sectors/track, 22844 cylinders  Units = cylinders of 16065 * 512 = 8225280 bytes    Device Boot      Start         End      Blocks   Id  System  /dev/sda1   *           1          25      200781   83  Linux  /dev/sda2              26        2636    20972857+  8e  Linux LVM

If it looks like that, with only 2 partitions, you can safely extend the current hard disk in the Virtual Machine.

However, if it looks like this:

~# fdisk -l    Disk /dev/sda: 187.9 GB, 187904819200 bytes  255 heads, 63 sectors/track, 22844 cylinders  Units = cylinders of 16065 * 512 = 8225280 bytes    Device Boot      Start         End      Blocks   Id  System  /dev/sda1   *           1          25      200781   83  Linux  /dev/sda2              26        2636    20972857+  8e  Linux LVM  /dev/sda3            2637       19581   136110712+  8e  Linux LVM  /dev/sda4           19582       22844    26210047+  8e  Linux LVM

It will show you that there are already 4 primary partitions on the system, and you need to add a new Virtual Disk to your Virtual Machine. You can still use that extra Virtual Disk to increase your LVM size, so don't worry.

2) The "hardware" part, "physically" adding diskspace to your VM

Increasing the disk size can be done via the vSphere Client, by editing the settings of the VM (right click > Settings).
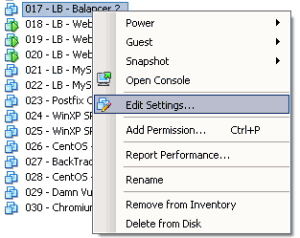
Edit settings

Now, depending on the first step, if there aren't four primary partitions yet, you can increasing the privisioned disk space.
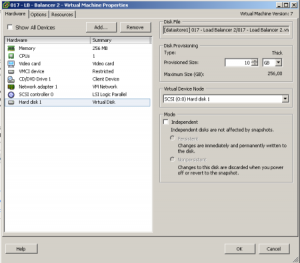
Increase disk size

If the "Provisioned Size" area (top right corner) is greyed out, consider turning off the VM first (if it does not allow "hot adding" of disks/sizes), and check if you have any snapshots made of that VM. You can not increase the disk size, as long as there are available snapshots.

Alternatively, if you already have 4 primary paritions, you can also choose "Add..." to add new Hardware "Virtual Disk" to your VM, with the desired extra space.

3) Partitioning the unallocated space: if you've increased the disk size

Once you've changed the disk's size in VMware, boot up your VM again if you had to shut it down to increase the disk size in vSphere. If you've rebooted the server, you won't have to rescan your SCSI devices as that happens on boot. If you did not reboot your server, rescan your SCSI devices as such.

First, check the name(s) of your scsi devices.

$ ls /sys/class/scsi_device/  0:0:0:0 1:0:0:0  2:0:0:0

Then rescan the scsi bus. Below you can replace the '0\:0\:0\:0' with the actual scsi bus name found with the previous command. Each colon is prefixed with a slash, which is what makes it look weird.

~$ echo 1 > /sys/class/scsi_device/0\:0\:0\:0/device/rescan

That will rescan the current scsi bus and the disk size that has changed will show up.

3) Partitioning the unalloced space: if you've added a new disk

If you've added a new disk on the server, the actions are similar to those described above. But instead of rescanning an already existing scsi bus like show earlier, you have to rescan the host to detect the new scsi bus as you've added a new disk.

$ ls  /sys/class/scsi_host/  total 0  drwxr-xr-x  3 root root 0 Feb 13 02:55 .  drwxr-xr-x 39 root root 0 Feb 13 02:57 ..  drwxr-xr-x  2 root root 0 Feb 13 02:57 host0

Your host device is called 'host0', rescan it as such:

$ echo "- - -" > /sys/class/scsi_host/host0/scan

It won't show any output, but running 'fdisk -l' will show the new disk.

Create the new partition

Once the rescan is done (should only take a few seconds), you can check if the extra space can be seen on the disk.

~$  fdisk -l    Disk /dev/sda: 10.7 GB, 10737418240 bytes  255 heads, 63 sectors/track, 1305 cylinders  Units = cylinders of 16065 * 512 = 8225280 bytes    Device Boot      Start         End      Blocks   Id  System  /dev/sda1   *           1          13      104391   83  Linux  /dev/sda2              14         391     3036285   8e  Linux LVM

So the server can now see the 10GB hard disk. Let's create a partition, by start fdisk for the /dev/sda device.

~$  fdisk /dev/sda    The number of cylinders for this disk is set to 1305.  There is nothing wrong with that, but this is larger than 1024,  and could in certain setups cause problems with:  1) software that runs at boot time (e.g., old versions of LILO)  2) booting and partitioning software from other OSs  (e.g., DOS FDISK, OS/2 FDISK)    Command (m for help): n

Now enter 'n', to create a new partition.

Command action  e   extended  p   primary partition (1-4)   p

Now choose "p" to create a new primary partition. Please note, your system can only have 4 primary partitions on this disk! If you've already reached this limit, create an extended partition.

Partition number (1-4): 3

Choose your partition number. Since I already had /dev/sda1 and /dev/sda2, the logical number would be 3.

First cylinder (392-1305, default 392): <enter>  Using default value 392  Last cylinder or +size or +sizeM or +sizeK (392-1305, default 1305): <enter>  Using default value 1305

Note; the cylinder values will vary on your system. It should be safe to just hint enter, as fdisk will give you a default value for the first and last cylinder (and for this, it will use the newly added diskspace).

Command (m for help): t  Partition number (1-4): 3  Hex code (type L to list codes): 8e  Changed system type of partition 3 to 8e (Linux LVM)

Now type t to change the partition type. When prompted, enter the number of the partition you've just created in the previous steps. When you're asked to enter the "Hex code", enter 8e, and confirm by hitting enter.

Command (m for help): w

Once you get back to the main command within fdisk, type w to write your partitions to the disk. You'll get a message about the kernel still using the old partition table, and to reboot to use the new table. The reboot is not needed as you can also rescan for those partitions using partprobe. Run the following to scan for the newly created partition.

~$ partprobe -s

If that does not work for you, you can try to use "partx" to rescan the device and add the new partitions. In the command below, change /dev/sda to the disk on which you've just added a new partition.

~$ partx -v -a /dev/sda

If that still does not show you the newly created partition for you to use, you have to reboot the server. Afterwards, you can see the newly created partition with fdisk.

~$  fdisk -l    Disk /dev/sda: 10.7 GB, 10737418240 bytes  255 heads, 63 sectors/track, 1305 cylinders  Units = cylinders of 16065 * 512 = 8225280 bytes    Device Boot      Start         End      Blocks   Id  System  /dev/sda1   *           1          13      104391   83  Linux  /dev/sda2              14         391     3036285   8e  Linux LVM  /dev/sda3             392        1305     7341705   8e  Linux LVM

3) Extend your Logical Volume with the new partition

Now, create the physical volume as a basis for your LVM. Please replace /dev/sda3 with the newly created partition.

~$  pvcreate /dev/sda3  Physical volume "/dev/sda3" successfully created

Now find out how your Volume Group is called.

~$  vgdisplay  --- Volume group ---  VG Name               VolGroup00  ...

Let's extend that Volume Group by adding the newly created physical volume to it.

~$  vgextend VolGroup00 /dev/sda3  Volume group "VolGroup00" successfully extended

With pvscan, we can see our newly added physical volume, and the usable space (7GB in this case).

~$  pvscan  PV /dev/sda2   VG VolGroup00   lvm2 [2.88 GB / 0    free]  PV /dev/sda3   VG VolGroup00   lvm2 [7.00 GB / 7.00 GB free]  Total: 2 [9.88 GB] / in use: 2 [9.88 GB] / in no VG: 0 [0   ]

Now we can extend Logical Volume (as opposed to the Physical Volume we added to the group earlier). The command is "lvextend /dev/VolGroupxx /dev/sdXX".

~$  lvextend /dev/VolGroup00/LogVol00 /dev/sda3  Extending logical volume LogVol00 to 9.38 GB  Logical volume LogVol00 successfully resized

If you're running this on Ubuntu, use the following.

~$  lvextend /dev/mapper/vg-name /dev/sda3  

All that remains now, it to resize the file system to the volume group, so we can use the space. Replace the path to the correct /dev device if you're on ubuntu/debian like systems.

~$  resize2fs /dev/VolGroup00/LogVol00  resize2fs 1.39 (29-May-2006)  Filesystem at /dev/VolGroup00/LogVol00 is mounted on /; on-line resizing required  Performing an on-line resize of /dev/VolGroup00/LogVol00 to 2457600 (4k) blocks.  The filesystem on /dev/VolGroup00/LogVol00 is now 2457600 blocks long.

If you got an error like this, it may mean your filesystem is XFS instead of standard ext2/ext3.

$ resize2fs /dev/mapper/centos_sql01-root  resize2fs 1.42.9 (28-Dec-2013)  resize2fs: Bad magic number in super-block while trying to open /dev/mapper/centos_sql01-root  Couldn't find valid filesystem superblock.  

In that case, you'll need to increase the XFS partition. Read here for more details: Increase/Expand an XFS Filesystem in RHEL 7 / CentOS 7.

And we're good to go!

~$  df -h  Filesystem            Size  Used Avail Use% Mounted on  /dev/mapper/VolGroup00-LogVol00 9.1G 1.8G  6.9G  21% /  /dev/sda1              99M   18M   77M  19% /boot

Wednesday 4 May 2016

Redirect script error and output messages to /dev/null

The syntax discussed below works with Bourne-like shells, such as sh, ksh, and bash:

$ command > /dev/null 2>&1  $ ./script.sh > /dev/null 2>&1  $ ./example.pl > /dev/null 2>&1

OR

command &>/dev/null  job arg1 arg2 &>/dev/null  /path/to/script arg1 &>/dev/null

Tuesday 3 May 2016

Increase “Open Files Limit” in Linux Box

If you are getting error "Too many open files (24)" then your application/command/script is hitting max open file limit allowed by linux. You need to increase open file limit as below:

Increase limit

Per-User Limit

Open file: /etc/security/limits.conf

Paste following towards end:

*         hard    nofile      500000  *         soft    nofile      500000  root      hard    nofile      500000  root      soft    nofile      500000

500000 is fair number. I am not sure what is max limit but 999999 (Six-9) worked for me once as far as I remember.

Once you save file, you may need to logout and login again.

pam-limits

I read at many places that an extra step is neede for limit to change for daemon processes. I did not need following yet, but if above changes are not working for you, you may give this a try.

Open /etc/pam.d/common-session

Add following line:

session required pam_limits.so

System-Wide Limit

Set this higher than user-limit set above.

Open /etc/sysctl.conf 

Add following:

fs.file-max = 2097152

Run:

sysctl -p

Above will increase "total" number of files that can remain open system-wide.

Verify New Limits

Use following command to see max limit of file descriptors:

cat /proc/sys/fs/file-max

Hard Limit

ulimit -Hn

Soft Limit

ulimit -Sn

if you are logged in as root:

Check limit for other user

Just replace www-data by linux username you wish to check limits for:

su - www-data -c 'ulimit -aHS' -s '/bin/bash'

Check limits of a running process:

Find process-id (PID):

ps aux | grep process-name

Suppose, XXX is PID, then run following commands to check limits:

cat /proc/XXX/limits