Search This Blog

Thursday, 21 December 2017

Mysql Backup Script

#!/bin/sh
now="$(date +'%d_%m_%Y_%H_%M_%S')"
filename="db_bugs_backup_$now".gz
backupfolder="/backups"
fullpathbackupfile="$backupfolder/$filename"
logfile="$backupfolder/"backup_log_"$(date +'%Y_%m')".txt
echo "mysqldump started at $(date +'%d-%m-%Y %H:%M:%S')" >> "$logfile"
mysqldump --user=DBUSER  --password=PASSWORD --default-character-set=utf8 bugs | gzip > "$fullpathbackupfile"
echo "mysqldump finished at $(date +'%d-%m-%Y %H:%M:%S')" >> "$logfile"
chown root "$fullpathbackupfile"
chown root "$logfile"
echo "file permission changed" >> "$logfile"
find "$backupfolder" -name db_backup_* -mtime +8 -exec rm {} \;
echo "old files deleted" >> "$logfile"
echo "operation finished at $(date +'%d-%m-%Y %H:%M:%S')" >> "$logfile"
echo "*****************" >> "$logfile"

Mysql Database and user creation

Database creation,
  • create database dbname;
User creation,
  • CREATE USER 'username'@'%' IDENTIFIED BY 'user@123';

Database Permission,

  • GRANT ALL PRIVILEGES ON dbname. * TO 'username'@'%';

Object Rights: SELECT, INSERT, UPDATE, DELETE , EXECUTE


DDL Rights: Create, Alter, References, Index, Create View, Create Routine, Alter Routine, Event,  Drop, Trigger


Other Rights:
 
Grant Options, Create temporary Tables, Lock tables


Thursday, 14 December 2017

Libre office installation Steps in Ubuntu

A. Remove bundled LibreOffice

LibreOffice  can be installed alongside older LibreOffice versions, but conflicts may occur.

To remove prior installations of LibreOffice:
sudo apt-get remove libreoffice-core

If you also want to remove LibreOffice configuration files, use the purge switch:
sudo apt-get remove --purge libreoffice-core

B. Install LibreOffice

Step 1 of 3 – Download compressed packages

Download LibreOffice from the official download page:www.libreoffice.org/download/

Select Linux x86 (deb) for 32 bits systems or Linux x64 (deb) for 64 bits systems.

This how-to supposes that the downloaded file (and language packs) is saved in the "Downloads" directory situated in your home directory.

Download as many language packs as you need.

Step 2 of 3 – Extract the .deb packages

The downloaded file is a compressed .tar.gz archive. In case you want to learn more about these extensions: tar, gzip. To extract this juicy archive, open the "Downloads" directory. Look for a file named:

LibreOffice_5.4.0_Linux_x86_deb.tar.gz or
LibreOffice_5.4.0_Linux_x86-64_deb.tar.gz

right-click on it and select "extract here ". Repeat the extraction process for all language packs. The .tar.gz archive(s) can now be deleted.

Step 3 of 3 – Install .deb packages

Open a terminal.
Change the current directory to the location of the .deb packages:
cd ~/Downloads/LibreOffice_5.4.0.x_Linux_x86_deb/DEBS

or for the 64 bits version:
cd ~/Downloads/LibreOffice_5.4.0.x_Linux_x86-64_deb/DEBS

(No need to write everything: use Tab ↹ to autocomplete the command line, or copy and paste with the middle-click mouse button)

Finally, install all .deb packages:
sudo dpkg -i *.deb

In case you're installing language packs, repeat the and steps cd dpkg for each language pack.

You're done! No need to restart, LibreOffice is ready to be used.

If you have problems launching LibreOffice, try out the following command:
libreoffice5.4
or
/opt/libreoffice5.4/program/soffice

If you're installing a development release (Beta) of LO 6.0, you can launch it with the following command:
lodev6.0

C. Uninstall LibreOffice

If you want to remove LibreOffice, use the following command:
sudo apt-get remove libreoffice5.4*

If you want to remove a development (beta) version of LibreOffice, use the following command:
sudo apt-get remove lodev*

Tuesday, 12 December 2017

Mounting VMFS with Ubuntu

The vSphere platform is in my opinion the most complete package for the virtualized datacenter. One of my gripes about it is the manipulation of data in the VMFS file system.. its mostly controlled via the vSphere client, and going deep into CLI on the host itself.That isn't a problem when you live only in a vSphere world but sometimes, for debugging or troubleshooting, an extra tool to get the data off of VMFS wouldn't hurt.

Thats where this tip comes in, there are tools out there that you can use on different operating systems to mount the VMFS datastore. For this article we are going to be using Ubuntu 11.04 desktop to mount a VMFS hard drive.

First off, we are going to need the tools, these are called simply VMFS-TOOLS, and luckily we can get it with a simple apt-get

sudo apt-get install vmfs-tools

Now this is a package install, so there are 3 commands included in this package:

vmfs-fuse debugvmfs fsck.vmfs

For this tip we are going to use vmfs-fuse, which is the utility to mount VMFS.

Lets MAN into VMFS-FUSE…

vmfs-fuse VOLUME MOUNTPOINT

Simple enough, now the only problem is that if we look into /dev and ls, we get a lot of permissions for the disk in question:

2011 05 28 1142

Thats right, 8 partitions esxi created, a simple fdisk will give us the readout of which one is the VMFS partition:

2011 05 28 1145

sdb3 it is!

sudo vmfs-fuse /dev/sdb3 /mnt/vmfs

if there is no errors, it should have mounted. Trying to explore the filesystem is not possible, thats because of the funky permissions it gives:

2011 05 28 1148

This removes only a little convienience, because we can still browser by using the paths

sudo ls /mnt/vmfs -lah

2011 05 28 1151

The pure intention of this tip is to copy VMs out of the VMFS file system for archiving or troubleshooting purposes. So we can copy the VM "test vm" to a folder in ubuntu.

Note that when you copy, all thin disks will be converted to Thick, meaning a thin vm of 8GB will take the full 8GB of space on your local file system.

2011 05 28 1137

Reference: http://www.planetvm.net/blog/?p=1592


VMware Snapshot

What is  VMware Snapshot?

  • A VMware snapshot is a copy of the virtual machine's disk file (VMDK) at a given point in time. Snapshots provide a change log for the virtual disk and are used to restore a VM to a particular point in time when a failure or system error occurs. Snapshots alone do not provide Backup.
  •  Any data that was writable on a VM becomes read-only when the snapshot is taken.
  •  VMware administrators can take multiple snapshots of a VM to create multiple possible point-in-time restore points.
  •  When a VM reverts to a snapshot, current disk and memory states are deleted and the snapshot becomes the new parent snapshot for that VM.
  •  The snapshot file cannot exceed the size of the original disk file, and it requires some overhead disk space.
  • Snapshots will grow rapidly with high disk-write activity volume. Most snapshots are deleted within an hour and VMware recommends deleting snapshots within 24 hours. 
  • Snapshot file formats include *–delta.vmdk file, *.vmsd file and *.vmsn file. Administrators create snapshots in VMware vSphere's Snapshot Manager or with the vmware-cmd command-line-utility.
  •  Deleting, or committing, snapshots merges all of the delta files into the VMDK. If delta files remain in the VM's directory after deletion, the snapshot did not delete properly.

VMware recommends the following best practices regarding snapshots:

  • Do not keep a single snapshot for more than 72 hours. While VMware supports up to 32 snapshots in a chain, try to limit chains to three snapshots.
  • Do not rely upon snapshots for I/O intensive VMs with rapid data changes, because significant data inconsistencies will occur when the VM is restored.

ESXi 5.x/6.x software installation in command line

To patch an ESXi 5.x/6.x host from the command line:


  1. Patches for VMware products can be obtained from the VMware patch portal. Select ESXi (Embedded and Installable) in the product dropdown and click Search.
  2. Click the Download link below the patch Release Name to download the patch to your system.
  3. Upload the patch to a datastore on your ESXi 5.x/6.x host using the Datastore Browser from vCenter or a direct connection to the ESXi 5.x/6.x host using the vSphere client.Note: VMware recommends creating a new directory on the datastore and uploading the patch file to this directory.
  4. Log into the local Tech Support Mode console of the ESXi 5.x/6.x host. For more information, see Using Tech Support Mode in ESXi 4.1 and ESXi 5.x (1017910).
  5. Migrate or power off the virtual machines running on the host and put the host into maintenance mode. The host can be put into maintenance mode from the command line with:# vim-cmd hostsvc/maintenance_mode_enter
  6. Navigate to the directory on the datastore where the patch file was uploaded to and verify that the file exists:# cd /vmfs/volumes/Datastore/DirectoryName
    # ls
    Where Datastore is the datastore name where the patch file was uploaded to, and DirectoryName is the directory you created on the datastore.
  7. Install or update a patch on the host using these esxcli commands:Notes:
    • To install or update a .zip file, use the -d option. To install or update a .vib file use the -v option.
    • Using the update command is the recommended method for patch application. Using this command applies all of the newer contents in a patch, including all security fixes. Contents of the patch that are a lower revision than the existing packages on the system are not applied.
    • Using the install command overwrites the existing packages in the system with contents of the patch you are installing, including installing new packages and removing old packages. The install command may downgrade packages on the system and should be used with caution. If required, the install command can be used to downgrade a system (only for image profiles) when the –allow-downgrade flag is set.

    Caution: The install method has the possibility of overwriting existing drivers. If you are using 3rd party ESXi images, VMware recommends using the update method to prevent an unbootable state.

    To Install:

    • Using local setup:# esxcli software vib install -d "/vmfs/volumes/Datastore/DirectoryName/PatchName.zip"
    • Install the ZIP file.

      esxcli --server=server_name software vib update --depot=/path_to_vib_ZIP/ZIP_file_name.zip

    • Where PatchName.zip is the name of the patch file you uploaded to the datastore.

      Note: Alternatively, you can use the datastore's UUID instead of the DirectoryName.

      For example:

      # esxcli software vib install -d "/vmfs/volumes/datastore1/patch-directory/ESXi500-201111001.zip"

      or

      # esxcli software vib install -d "/vmfs/volumes/a2bb3e7c-ca10571c-cec6-e5a60cc0e7d0/patch-directory/ESXi500-201111001.zip"

    • Using http setup:# esxcli software vib install -v viburl Where viburl is the URL to the http depot where VIB packages reside.

      For example:

      # esxcli software vib install -v https://hostupdate.vmware.com/software/VUM/PRODUCTION/main/esx/vmw/vib20/tools-light/VMware_locker_tools-light_5.0.0-0.7.515841.vib

    To Update:

    • Using local setup:# esxcli software vib update -d "/vmfs/volumes/Datastore/DirectoryName/PatchName.zip" Where PatchName.zip is the name of the patch file you uploaded to the datastore.

      Note: Alternatively, you can use the datastore's UUID instead of the DirectoryName.

      For example:

      # esxcli software vib update -d "/vmfs/volumes/datastore1/patch-directory/ESXi500-201111001.zip"

      or

      # esxcli software vib update -d "/vmfs/volumes/a2bb3e7c-ca10571c-cec6-e5a60cc0e7d0/patch-directory/ESXi500-201111001.zip"

    • Using http setup:# esxcli software vib update -v viburl Where viburl is the URL to the http depot where VIB packages reside.

      For example:

      # esxcli software vib update -v https://hostupdate.vmware.com/software/VUM/PRODUCTION/main/esx/vmw/vib20/tools-light/VMware_locker_tools-light_5.0.0-0.7.515841.vib

  8. Verify that the VIBs are installed on your ESXi host:# esxcli software vib list For example:

    # esxcli software vib list

    Name              Version                     Vendor Acceptance Level Install Date
    —————– ————————— —— —————- ————
    ata-pata-amd      0.3.10-3vmw.500.0.0.469512  VMware VMwareCertified  2012-05-04
    ata-pata-atiixp   0.4.6-3vmw.500.0.0.469512   VMware VMwareCertified  2012-05-04
    ata-pata-cmd64x   0.2.5-3vmw.500.0.0.469512   VMware VMwareCertified  2012-05-04
    ata-pata-hpt3x2n  0.3.4-3vmw.500.0.0.469512   VMware VMwareCertified  2012-05-04

  9. After the patch has been installed, reboot the ESX host:# reboot
  10. After the host has finished booting, exit maintenance mode and power on the virtual machines:# vim-cmd hostsvc/maintenance_mode_exit

Tuesday, 5 December 2017

SSL Support to Tomcat 6 on Windows/Linux

Setting up SSL on Tomcat 6 is easy and you don't have to do much for converting your web application to work with the Https protocol. But however, the problem you would find to set up SSL is the documentation available over the web. The documentation source is available on the Apache site but it starts off good and ends with a lot of confusion. Especially I was confused on the OpenSSL part where it says to use OpenSSL.

It might be good in a production environment to use OpenSSL but if you just want to test out SSL with Tomcat 6 alone then it is more than enough to just have your JDK and Tomcat setups. So I would make you walk through the same steps which I did while getting SSL up and running and building a secured web app within a matter of minutes.

The things which I have used to setup SSL consists of:

  • JDK 1.6
  • Tomcat 6

Even though I have used the latest version I don't see any problems which you might face in carrying out the same set of steps for JDK 1.5 which I am about to explain. JDK comes shipped with a keytool executable which is required to generate a keystore. The keytool can be found in the earlier version of JDK too. The 3 steps which would make you to get started with setting up SSL are:

  1. Generating the Keystore file
  2. Configuring Tomcat for using the Keystore file
  3. Configuring your web application to work with SSL

Let's get this party started now.

1. Generating the KeyStore file

The keystore file is the one which would store the details of the certificates necessary to make the protocol secured. Certificates contain the information as to who is the source from which you are receiving the application data and to authenticate whether it is the intended party or not. To make this keystore you would have to use the keytool. So open command prompt in Windows or the shell in Linux and type:

cd %JAVA_HOME%/bin on Windows

cd $JAVA_HOME/bin on Linux

You would land up in the Java bin directory. Now time to run the keytool command. You have to provide some parameters to the command as follows :

keytool -genkey -alias techtracer -keypass ttadmin -keystore techtracer.bin -storepass ttadmin

The highlighted words are the ones which you would have to change according to your requirements. But keep one thing in mind that both the keypass and storepass passwords should be the same. The .bin file is actually your keystore file. It would now start a questionnaire. So fill in the relevant details accordingly. Look below for a reference as to what to answer for the questions.

What is your first and last name?
[Unknown]: sakthiv r
What is the name of your organizational unit?
[Unknown]: vetti
What is the name of your organization?
[Unknown]: IGS
What is the name of your City or Locality?
[Unknown]: CHN
What is the name of your State or Province?
[Unknown]: TN
What is the two-letter country code for this unit?
[Unknown]: IN
Is CN=shekhar raj, OU=home, O=techtracer, L= CHN, ST=TN, C=IN correct?
[no]: yes

The command would then conclude. It would make a .bin file with the name you had provided inside the bin directory itself. In my case it was techtracer.bin which was located in

C:\Program Files\Java\jdk1.6.0_02\bin\

Put the .bin file in the webapps directory of Tomcat. This is required to avoid the need to give an absolute path of the file in the next step.

2. Configuring Tomcat 6 for using the Keystore file

Here we would be making some changes to the server.xml file inside tomcat to tell it to use the keystore which was created in the earlier step for configuring SSL. Open the file server.xml which can be found as:

/conf/server.xml

Now you have to modify it. Find the Connector element which has port="8443″ and uncomment it if already not done. Add two lines. The highlighted lines are the newly added ones.

keystoreFile="../webapps/techtracer.bin"
keystorePass="ttadmin" />

You can notice that I have given the path to the keystoreFile property as relative to tomcat bin directory because the startup command will look for the .bin file. Now all you have to do is start your server and check the working of SSL by pointing your browser to the URL to:

https://localhost:8443/

Now that you have your tomcat running in the SSL mode you are ready to deploy an application to test its working. You must note that still your tomcat can run in normal mode too at the same time i.e on port 8080 with http. So it is but obvious that any application deployed to the server will be running on http and https at the same time. This is something that we don't want. We want our application to run only in the secured mode.

3. Configuring your web application to work with SSL

In order to do this for our test, take any application which has already been deployed successfully in Tomcat and first access it through http and https to see if it works fine. If yes, then open the web.xml of that application and just add this XML fragment before web-app ends i.e


securedapp
/*


CONFIDENTIAL

Explanation of the fragment is beyond the scope of this tutorial but all you should notice is that the /* indicates that now, any resource in your application can be accessed only with https be it Servlets or JSP's. The term CONFIDENTIAL is the term which tells the server to make the application work on SSL. If you want to turn the SSL mode for this application off then just turn don't delete the fragment. Just put the value as NONE instead of CONFIDENTIAL. That's it!

Conclusion

These were the 3 easy steps in which you can make Tomcat 6 to work in the SSL mode and also it tells you how easily you can turn the SSL mode on and off. If you find any difficulty or are not clear on any of the above steps feel free to drop in your queries. If you like this tutorial it would be nice of you to drop in a comment of appreciation or feedback as to how this tutorial can be improved.

SSL Support to Tomcat 6

I recently had an enjoyable experience trying to figure out how to configure SSL support within Tomcat. I figured it would be pretty easy, but I bumped into some troubles along the way so it ended up taking a couple hours. The key issue is that there isn't a way to use Java's keytool to import a private key for an SSL certificate. Now that I have a handle on things and SSL is working, I figured I would post a walkthrough to help anybody who may be running into the same roadblock.

My Environment

If you are running in a similar hosting environment, these steps should guide you through setting up SSL.

Step 1

The first step is to get a copy of your private key and a certificate for that key. You will also need a copy of the root certificate from your CA (such as VeriSign or GeoTrust). These were provided to me in Base64 format by my web host, and you should save these all as .pem files.

  • My web host first provided me with a private key. I downloaded it as a .txt file, and then proceeded to open it using notepad. The file started with
    -----BEGIN PRIVATE KEY----- and ended with
    -----END PRIVATE KEY----- with a block of text in between. Take this file and save it as private.pem (you can either just rename the file you download, or copy and past the text into a new file).
  • My web host then ordered the SSL certificate for me, and a little later I was sent an e-mail containing a similar chunk of text as before. The difference was that it started with
    -----BEGIN CERTIFICATE----- and ended with
    -----END CERTIFICATE-----. Again, open notepad, paste the text, and save this file as cert.pem
  • Lastly, you will need to obtain a copy of the root certificate. My SSL certificate came from GeoTrust, and after a bit of searching I found their root certificates are available from their web site. Downloaded the certificate in Base-64 encoded X.509 format and save this file as root.pem

Step 2

We now have the keys and certificates that we need to configure SSL on our server. However, we need to convert them into a format that Tomcat supports. For this, I used a free tool called OpenSSL. Among other capabilities, OpenSSL will help you convert keys between different formats, which is exactly what we're looking for. I'm lazy and didn't want to compile the source code myself, so after a bit of searching I found that Shining Light Productions provides the binaries for Windows. Download this package and use the installer to get everything setup.

Step 3

Once OpenSSL is installed, you must take the three .pem files and combine them into a single .pem file. First, open notepad and copy the contents of root.pem into the file. Next, copy the contents of cert.pem on to the next line. Last, copy the contents of private.pem at the end. The data should look something like this (with more text in between):

-----BEGIN CERTIFICATE-----
MIIDIDCCAomgAwIBAgIENd70zzANB
1voqZiegDfqnc1zqcPGUIWVEX/r87
yloqaKHee9570+sB3c4
-----END CERTIFICATE-----
-----BEGIN CERTIFICATE-----
MIIDIDCCAomgAwIBAgIENd70zzANB
1voqZiegDfqnc1zqcPGUIWVEX/r87
yloqaKHee9570+sB3c4
-----END CERTIFICATE-----
-----BEGIN PRIVATE KEY-----
MIIDIDCCAomgAwIBAgIENd70zzANB
1voqZiegDfqnc1zqcPGUIWVEX/r87
yloqaKHee9570+sB3c4
-----END PRIVATE KEY-----

Save this file as ssl.pem.

Step 4

Open up a command prompt window and navigate into the "bin" directory of your OpenSSL installation. We want to take the ssl.pem file and convert it into a PKCS12 keystore, which we will call ssl.p12. This can be accomplished by running the following command:

openssl pkcs12 -export -in ssl.pem -out ssl.p12 -name tomcat

Note: Be sure to use the correct paths for your ssl.pem and ssl.p12 files. You will be prompted to create a password for this keystore.

Step 5 (Optional)

You can verify the PKCS12 conversion worked by using Java's keytool command. First switch to the "bin" directory of your JDK and run:

keytool -v -list -keystore ssl.p12 -storetype pkcs12

Note: Be sure to use the correct path for your ssl.p12 file. You will be prompted to enter the password you created earlier. Keytool will then list out the contents of the keystore. Look towards the top of the output to ensure that the keystore type is PKCS12, that the keystore contains 1 entry, the entry type is a PrivateKeyEntry, and the certificate chain length is 2.

Keystore type: PKCS12
Keystore provider: SunJSSE

Your keystore contains 1 entry

Alias name: tomcat
Creation date: Jun 16, 2007
Entry type: PrivateKeyEntry
Certificate chain length: 2

Step 6

Now we just need to configure Tomcat's server.xml file to use this keystore. First, take the ssl.p12 file and store it on your web server. Then navigate to the "conf" folder within your Tomcat installation directory. Open the server.xml file in notepad and add the following connector:


Note: Be sure to use the correct path to your keystore and the correct password. Depending on your setup, you may need to use a different connector configuration. In particular, Tomcat needs a different setup if you are using the Tomcat Native Library. Please consult the Tomcat documentation for more details.

Step 7

Reboot the Tomcat server and try accessing your web site using https. If everything is configured correctly, you should be able to successfully view your web site without any errors or warnings.

Conclusion

Hopefully you found this walkthrough to be helpful. I am aware that most of these steps are pretty specific to my environment and how my web host provided me with my SSL certificate. However, I would think with some hacking around you can adapt these steps to suit your needs. If you run across any difficulties or these steps don't work for your situation, feel free to post a comment describing your environment and I will do my best to provide some assistance .

Tomcat Performance Tuning Tips

Most companies I have worked for use Tomcat as Servlet Container. It is de facto standard just like how Apache been used as Web Server. However, most of us just drag our war file to the webapp folder and use Tomcat with all the settings as default out of the box. It works fine in development environment but may not in production. This article will give you advice in several areas:
  1. Production Tomcat Architecture
  2. Tuning tomcat for performance
  3. Resolving problems which affect availability

Tomcat(Production)

In production, Tomcat relies on a number of resources which can impact its overall performance. Understanding the overall system architecture is key to tuning performance and troubleshooting problems.

  1. Hardware: CPU(s), memory, network IO and file IO
  2. OS: SMP (symmetric multiprocessing) and thread support
  3. JVM: version, tuning memory usage, and tuning GC
  4. Tomcat: version (example, Tomcat 6 supports NIO)
  5. Application: Application design can have the largest impact on overall performance
  6. Database: concurrent DB connection is allowed (pooling and object caching)
  7. Web Server: Apache can sit in front of Tomcat and serves the static content. It also can do load balancing across multiple Tomcat instances.
  8. Network: Network delays.
  9. Remote Client: How fast is the communication protocol? Content can be compressed.

Performance Tuning

How to see performance

  • Request latency is key b/c it reflects the responsiveness of your site for visitors.
  • The test environment should match production as closely as possible.
  • The data volume is important to simulate in database side.
  • Test HTTP requests with different request parameters (test corner cases)
  • Use load test to simulate the traffics (ex. JMeter)
  • Final tests should be over longer periods like days because JVM performance changes over time and can actually improve if using HotSpot. Memory leaks, db temporary unavailable, etc can only be found when running longer tests.

JVM

  • Sun Java and later releases include some profiling optimizer customized for a long-running server application.
  • Tomcat will freeze processing of all requests while the JVM is performing GC. On a poorly tuned JVM, this can last 10's of seconds. Most GC's should take <>
  • Tune the -Xms (min) and -Xmx (max) java stack memory (set them to the same value can improve GC performance)
  • Make sure the java process always keeps the memory it uses resident in physical memory and not swapped out to virtual memory.
  • Use -Xincgc to enable incremental garbage collection
  • Try reducing -XSS thread stack memory usage

Tomcat

  • Tomcat 6 supports NIO.
  • Set "reloadable" false - remove unnecessary detection overhead
  • Set "liveDeploy" to false - liveDeploy controls whether your webapps directory is periodically checked for new war files. This is done using the background thread.
  • Set "debug" to 0
  • Set "swallowOutput" to true - This makes sure all output to stdout or stderr for a web application gets directed to the web application log rather than the console or catalina.out. This makes it easier to troubleshoot problems.
  • Connector configuration - minProcessor, maxProcessor, acceptCount, enableLookups. Don't set the acceptCount too high b/c this sets the number of pending requests awaiting processing. It is better to deny few requests than overload Tomcat and cause problems for all requests. Set "enableLookups" to false b/c DNS lookups can add significant delays.

dbcp

  • We use connection pool provided by Spring instead
  • Using middleware to persist and cache objects from your database can significantly improve performance b/c of fewer db calls, less thrashing of the JVM for creation and subsequent GC of object created for resultset.

Application design and profiling

  • If the data used to generate a dynamic page rarely changes, modify it to a static page which you regenerate periodically.
  • Cache dynamic page
  • Use tool like JProble to profile your web applications during development phase
  • Look for possible thread synchronization bottlenecks
  • Date and Time thread synchronization bottleneck

Troubleshooting

Collecting and analyzing log data from production

Common problems in production

  • Broken pipe - For HTTP Connector indicates that the remote client aborted the request. For web server, JK Connector indicates that the web server process or thread was terminated. These are normal and rarely due to a problem with Tomcat. However, if you have a long request, the connectionTimeout may close the connection before you send your response back.
  • Tomcat freezes or pauses with no request being processed - usually due to a long pause of JVM GC. A long pause can cause a cascading effect and high load once Tomcat starts handling requests again. Don't set the "acceptCount" too high and use java -verbose:gc startup argument to collect GC data.
  • Out of Memory Exception - look into application code to fix the leak (profile tool can help). Increase available memory on the system via -Xmx. Restart tomcat!
  • Database connection failure - connection used up when traffic is the spike.
  • Random connection close exception - when you close your connection twice. First close(), the connection returns to the pool. It may be picked up by another thread. Now, second close() may close a connection that is being used by other thread. Don't close connection twice, use JDBC Template from Spring to avoid this problem.

Mule ESB Service Script

​# description: Mule ESB service
#. /etc/init.d/functions
#
if [ -f /etc/sysconfig/mule ]; then
. /etc/sysconfig/mule
fi
# Set JDK related environment
#JAVA_HOME=/opt/jdk1.7.0_45
#JAVA_HOME=/opt/jdk
#PATH=$PATH:$JAVA_HOME/bin:$JRE_HOME
#JRE_HOME=$JAVA_HOME/jre
#JATH=$PATH:$JRE_HOME
export JAVA_HOME
export JRE_HOME
export PATH

# Set Mule related environment
MULE_HOME=/opt/Mule-ESB-3.8.3
MULE_LIB=$MULE_HOME/lib
PATH=$PATH:$MULE_HOME/bin
RUN_AS_USER=root
#MULE_ENV=production
MULE_ENV=prod
# Export environment variables
export JAVA_HOME MULE_HOME MULE_LIB PATH MULE_ENV RUN_AS_USER

case "$1" in
start)
echo "Start service mule3.8.3"
$MULE_HOME/bin/mule start -M-Dspring.profiles.active=$MULE_ENV -M-DMULE_ENV=$MULE_ENV  -M-Dmule.env=$MULE_ENV -M-Dmy_password=Admin@1234
;;
stop)
echo "Stop service mule3.8.3"
$MULE_HOME/bin/mule stop
;;
restart)
echo "Restart service mule3.8.3"
$MULE_HOME/bin/mule restart -M-Dspring.profiles.active=$MULE_ENV -M-DMULE_ENV=$MULE_ENV -M-Dmule.env=$MULE_ENV -M-Dmy_password=Admin@1234
;;
status)
echo "status of service mule3.8.3"
$MULE_HOME/bin/mule status -M-Dspring.profiles.active=$MULE_ENV -M-DMULE_ENV=$MULE_ENV
;;
*)
echo "Usage: $0 {start|stop|restart|status}"
exit 1
;;

Wednesday, 8 November 2017

Firefox upgrade in Ubuntu

   We cannot upgrade Firefox to a recent version in Ubuntu just by navigating to Help and by clicking the Check for Updates option!- the way usually followed by everyone to upgrade Firefox browser on their Windows machine. We can upgrade it, by two ways. Either by adding a PPA and upgrade or by downloading the binaries and installing it manually.

Via Terminal:

Step1: Adding Firefox PPA key

→ Take your terminal

Copy paste this code in your terminal

1
sudo add-apt-repository ppa:mozillateam/firefox-next

Step 2: Update

→ To finish indexing the repository

→ Please don't close the terminal window before completing the update process.

1
sudo apt-get update

Step 3: Installing Firefox

->To upgrade copy paste the command after following the above steps

1
sudo apt-get install firefox

→ When it prompts for Y or N, type Y

→ Wait for the process to complete

→ Restart your browser, if it is opened.


Monday, 23 October 2017

Remove The Grub Password

a) If you are using Debian Linux you need to modify /boot/grub/menu.lst file:
# cd /mnt/boot/grub
# vi menu.lst

b) If you are using Suse Linux you need to modify /etc/grub.conf file
# cd /mnt/etc
# vi grub.conf

If you are using Red Hat / Fedora Linux you need to modify /boot/grub/grub.conf file
# cd /mnt/boot/grub
# vi grub.conf

Once file opened using a text editor, locate password line and remove it:
password --md5 $1$9sdflksdf/sdf44k

Fig.03: Removing The Grub Password Line

Save and close the file. Reboot the system.
# sync; sync
# cd /
# umount /mnt
# reboot

Change Root password

Now your Grub password is removed from the system. You need to login to the system without any password. To restore root user password boot system into a single user mode.

1) At Grub prompt press 'e' to edit command before booting.

2) Select second line

3) Again, press 'e' to edit selected command

4) Type the following line
init=/bin/sh
OR
init=/bin/bash

Fig.04: Booting into a single user mode using Grub

4) Press 'b' to boot system.

5) Now you are at shell prompt. Just change root password with the passwd command:
# passwd
Please note that depend upon your Linux distribution you may need to remount root partition in read/write mode before running the above command.


Thursday, 17 August 2017

Docker commands

root@docker:~# docker --help

Usage:    docker COMMAND

A self-sufficient runtime for containers

Options:
      --config string      Location of client config files (default
                           "/home/ubuntu/.docker")
  -D, --debug              Enable debug mode
      --help               Print usage
  -H, --host list          Daemon socket(s) to connect to
  -l, --log-level string   Set the logging level
                           ("debug"|"info"|"warn"|"error"|"fatal")
                           (default "info")
      --tls                Use TLS; implied by --tlsverify
      --tlscacert string   Trust certs signed only by this CA (default
                           "/home/ubuntu/.docker/ca.pem")
      --tlscert string     Path to TLS certificate file (default
                           "/home/ubuntu/.docker/cert.pem")
      --tlskey string      Path to TLS key file (default
                           "/home/ubuntu/.docker/key.pem")
      --tlsverify          Use TLS and verify the remote
  -v, --version            Print version information and quit

Management Commands:
  config      Manage Docker configs
  container   Manage containers
  image       Manage images
  network     Manage networks
  node        Manage Swarm nodes
  plugin      Manage plugins
  secret      Manage Docker secrets
  service     Manage services
  stack       Manage Docker stacks
  swarm       Manage Swarm
  system      Manage Docker
  volume      Manage volumes

Commands:
  attach      Attach local standard input, output, and error streams to a running container
  build       Build an image from a Dockerfile
  commit      Create a new image from a container's changes
  cp          Copy files/folders between a container and the local filesystem
  create      Create a new container
  diff        Inspect changes to files or directories on a container's filesystem
  events      Get real time events from the server
  exec        Run a command in a running container
  export      Export a container's filesystem as a tar archive
  history     Show the history of an image
  images      List images
  import      Import the contents from a tarball to create a filesystem image
  info        Display system-wide information
  inspect     Return low-level information on Docker objects
  kill        Kill one or more running containers
  load        Load an image from a tar archive or STDIN
  login       Log in to a Docker registry
  logout      Log out from a Docker registry
  logs        Fetch the logs of a container
  pause       Pause all processes within one or more containers
  port        List port mappings or a specific mapping for the container
  ps          List containers
  pull        Pull an image or a repository from a registry
  push        Push an image or a repository to a registry
  rename      Rename a container
  restart     Restart one or more containers
  rm          Remove one or more containers
  rmi         Remove one or more images
  run         Run a command in a new container
  save        Save one or more images to a tar archive (streamed to STDOUT by default)
  search      Search the Docker Hub for images
  start       Start one or more stopped containers
  stats       Display a live stream of container(s) resource usage statistics
  stop        Stop one or more running containers
  tag         Create a tag TARGET_IMAGE that refers to SOURCE_IMAGE
  top         Display the running processes of a container
  unpause     Unpause all processes within one or more containers
  update      Update configuration of one or more containers
  version     Show the Docker version information
  wait        Block until one or more containers stop, then print their exit codes

Run 'docker COMMAND --help' for more information on a command.

Wednesday, 16 August 2017

AMQP, RabbitMQ and Celery - A Visual Guide For Dummies

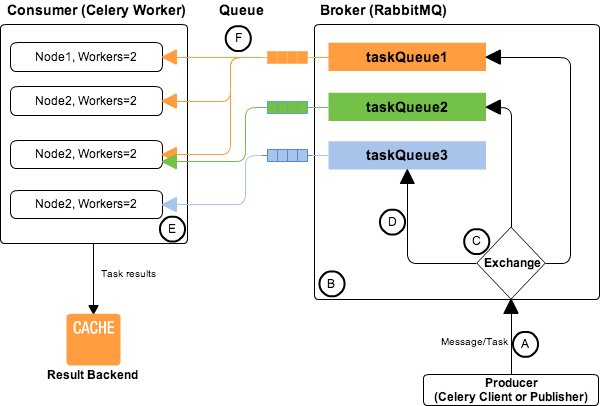
Celery is an asynchronous distributed task queue. RabbitMQ is a message broker which implements the Advanced Message Queuing Protocol (AMQP). Before we describe relationship between RabbitMQ and Celery, a quick overview of AMQP will be helpful 12.

Amqp Key Terms

Message Or Task

A message or task consists of attributes (headers) and payload (body). Some attributes are used by broker but most are used by consumers. Optional attributes are known as headers. Some common attributes are

  1. Content type
  2. Content encoding
  3. Routing key

Massage payload or body contains data that goes to the consumer. Normally a serialisation format such as JSON is used for message payload. Content type and content encoding attributes are used to communicate the serialisation format. An example message payload serialised in JSON looks like,

{      "task": "myapp.tasks.add",      "id": "54086c5e-6193-4575-8308-dbab76798756",      "args": [4, 4],      "kwargs": {}  }

Producer

A producer is a user application that sends messages.

Broker

A broker receives messages from producer and router them to consume. A broker consists an exchange and one or more queues.

Exchange

A producer can send messages to queues only via exchange. Exchanges take a message from producer and route it into zero or more queues. The routing algorithm used depends on the exchange type and rules called bindings.

Queue

A message or task queue is a buffer that stores messages.

Bindings

Bindings are rules that the exchange uses to route messages to queues.

Routing Keys

Bindings may have an optional routing key attribute. An exchange may use this field to route a message to the bound queue.

Celery and RabbitMQ
Celery and RabbitMQ

Consumer

A consumer is an application that receives messages and process them.

Celery

Celery generally hides the complexity of AMQP protocols 3. Celery act as both the producer and consumer of RabbitMQ messages. In Celery, the producer is called client or publisher and consumers are called as workers. It is possible to use a different custom consumer (worker) or producer (client).

RabbitMQ or AMQP message queues are basically task queues.

A

Message originates from a Celery client. The message body 4 contains

  • name of the task to execute,
  • task id (UUID)
  • arguments to execute task with
  • additional metadata – like the retries, eta, expires.

An example Celery message,

{"id": "4cc7438e-afd4-4f8f-a2f3-f46567e7ca77",   "task": "celery.task.PingTask",   "args": [],   "kwargs": {},   "retries": 0,   "eta": "2009-11-17T12:30:56.527191"  }

B

RabbitMQ route messages/tasks to one or more queues. Routing of tasks requires:

  1. Defining queues using CELERY_QUEUES setting. CELERY_QUEUES is a map of queue names and their exchange/exchange_type/binding_key.
  2. Specifying task destination. The destination for a task is decided by the following (in order)

    a. The Routers defined in CELERY_ROUTES setting. CELERY_ROUTES is a map of task names and their queue/routing_key.

    b. The routing arguments to Task.apply_async().

    c. Routing related attributes defined in the Task itself.

In the AMQP both routing_key and binding_key are referred as the routing key.

C

The exchange type defines how the messages are routed through the exchange. The exchange types defined in the standard are direct, topic, fanout and headers.

D

The relationship between exchanges and a queue is called a binding.

E

Normally one server will have one node, but you can run multiple nodes on the same server.

Each node has multiple worker processes or threads. By default multiprocessing is used to perform concurrent execution of tasks.

The number of worker processes/threads can be changed using the —concurrency argument and defaults to the number of CPUs available on the machine.

F

Various messaging scenarios are supported between Node to taskQueue -1:M, M:M, M:1, 1:1, Round-robin etc.

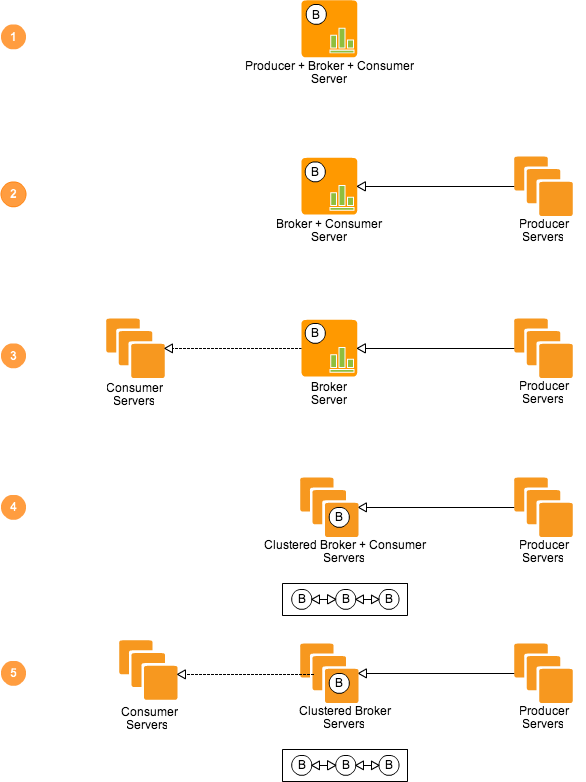
Producer, Broker, Consumer Arrangements

As AMQP is a network protocol, the producers, consumers and the broker can all reside on the same or different machines. Following are the possible arrangements for producer, broker and consumer,

Celery and RabbitMQ- Producer-Broker-Consumer Arrangements

  1. AMQP in 10 mins 

  2. AMQP Concepts 

  3. AMQP Primer 

  4. Celery Messages 

Tuesday, 15 August 2017

Mail command in Linux

Install mail command on CentOS/Redhat:

# yum install mailx  

Install mail command on Ubuntu/Debian:

$ sudo apt-get install mailutils  

Sending Test Email

After installing mail command packages on your system, send a test email using below command.

# echo "Message Body" | mail -s "Message Subject" receiver@example.com  

Friday, 14 July 2017

Systemd service script example

#sudo vi  /etc/systemd/system/dummy_startup.service


[Unit]

Description=startup script


[Service]

ExecStart=/bin/su - ubuntu -c "/bin/bash /home/ubuntu/dummy_startup.sh"


[Install]

WantedBy=multi-user.target


  • Reload the systemctl service to update.


sudo systemctl daemon-reload


  • Starting the dummy_startup.service


sudo systemctl start dummy_startup.service


  • Checking the Status of Services of the  dummy_startup.service.


sudo systemctl status dummy_startup.service


  • Enabling  dummy_startup.service in runlevel.


sudo systemctl enable dummy_startup.service


Note:

If any changes made after dummy_startup.service file enabled as a service. It's required to reload the daemon by using the command "sudo systemctl daemon-reload"


In case of above solution doesn't fix the issue. It's required to disabled the service using command  "sudo systemctl disable dummy_startup.service" and re-enable it using "sudo systemctl enable dummy_startup.service"


Thursday, 13 July 2017

How to set manual date in linux command

date --set="2 OCT 2006 18:00:00"


[root@ip-172-31-6-98 ec2-user]# ls

dgc_linux_5_0_3-FINAL.sh

[root@ip-172-31-6-98 ec2-user]# rm -rf dgc_linux_5_0_3-FINAL.sh

[root@ip-172-31-6-98 ec2-user]# date

Fri Jul 7 02:36:45 EDT 2017

[root@ip-172-31-6-98 ec2-user]# date --set="6 Jul 2017 02:37:30"

Thu Jul 6 02:37:30 EDT 2017

[root@ip-172-31-6-98 ec2-user]# date

Thu Jul 6 02:37:34 EDT 2017

[root@ip-172-31-6-98 ec2-user]# datehwclock -r

bash: datehwclock: command not found

[root@ip-172-31-6-98 ec2-user]# hwclock -r

Friday 07 July 2017 02:41:59 AM EDT -0.508323 seconds

[root@ip-172-31-6-98 ec2-user]# ln -sf /usr/share/zoneinfo/America/New_York /etc/localtime

[root@ip-172-31-6-98 ec2-user]# date

Thu Jul 6 02:43:42 EDT 2017

[root@ip-172-31-6-98 ec2-user]#

Internet Explorer SSL VPN troubleshoots

Tools -> Internet Options -> Security -> Trusted Sites
Move to low
Disable protected mode
Click sites then add the SSL VPN page to be a trusted member
While adding the trusted site, uncheck "Require server verification for all sites on this zone"


Tools -> Internet Options -> Advanced -> Security section
Enable "Allow sofware to run or install even if the signature is invalid"

Additionally, you should download the Microsoft Visual C++ Distribution 2010 and ensure you're running the latest version of Java.


Add the ASA as a Trusted Site

When you access the ASA in Internet Explorer, you will receive a certificate error if the site is not included as a trusted site.

Complete these steps in order to add the ASA as a trusted site:

  1. In Interent Explorer, choose Tools > Internet Options.

  2. Click the Security tab, and choose Trused sites.


Mysql root password reset

sudo /etc/init.d/mysql stop

Now start up MySQL in safe mode, so you'll skip the privileges table:

sudo mysqld_safe --skip-grant-tables &

Login with root:

mysql -uroot

And assign the DB that needs to be used:

use mysql;

Now all you have to do is reset your root password of the MySQL user and restart the MySQL service:

update user set authentication_string=password('1111') where user='root';  flush privileges;

quit and restart MySQL:

quit  sudo /etc/init.d/mysql stop  sudo /etc/init.d/mysql start

NTFS mount in linux box

  • yum install wget

  • yum install gcc*

  • tar -xvf ntfs-3g_ntfsprogs-2017.3.23.tgz

  • chmod 777 -R ntfs-3g_ntfsprogs-2017.3.23

  • cd ntfs-3g_ntfsprogs-2017.3.23

  • ./configure

  • make

  • make install

  • mount -t ntfs-3g /dev/sdb2 /mnt/


Timezone setting in Linux

ln -sf /usr/share/zoneinfo/America/New_York /etc/localtime


Ubuntu Static IP configuration for Server

auto lo

iface lo inet loopback


# The primary network interface

auto enp4s0

iface enp4s0 inet static

address 192.168.168.129

netmask 255.255.255.0

network 192.168.168.0

broadcast 192.168.168.255

gateway 192.168.168.168

dns-nameservers 192.168.168.103 192.168.168.250

# dns-* options are implemented by the resolvconf package, if installed

dns-search techsol.com

visual studio 2017 startup unknown issue

If you are updating, in order for this to work you MUST delete C:\Users\<your user>\AppData\Local\Microsoft\VisualStudio\15.0_[somenumber]\privateregistry.bin.

Vsphere free license limitation

Free version Hypervisor (Esxi) Version 6.0

2 (physical) CPU limit

No Ram limit (removed since 5.5)

Hypervisor Spec

Number of cores per physical CPU: No limit

Number of physical CPUs per host: No limit

Number of logical CPUs per host: 480

Maximum vCPUs per virtual machine: 8

webfilter fortiguard blocking error

FG100 # show full webfilter fortiguard

config webfilter fortiguard

set cache-mode ttl

set cache-prefix-match enable

set cache-mem-percent 2

set ovrd-auth-port-http 8008

set ovrd-auth-port-https 8010

set ovrd-auth-port-warning 8020

set ovrd-auth-https enable

set warn-auth-https enable

set close-ports disable

set request-packet-size-limit 0

set ovrd-auth-hostname ''

set ovrd-auth-cert "Fortinet_Firmware"

end


FG100

Unknown action 0


FG100 # config webfilter fortiguard


FG100 (fortiguard) # set ovrd-auth-port-warning 58020


FG100 (fortiguard) # exit

please use 'end' to return to root shell


FG100 (fortiguard) # end


FG100 # show full webfilter fortiguard

config webfilter fortiguard

set cache-mode ttl

set cache-prefix-match enable

set cache-mem-percent 2

set ovrd-auth-port-http 8008

set ovrd-auth-port-https 8010

set ovrd-auth-port-warning 58020

set ovrd-auth-https enable

set warn-auth-https enable

set close-ports disable

set request-packet-size-limit 0

set ovrd-auth-hostname ''

set ovrd-auth-cert "Fortinet_Firmware"

end


FG100

config webfilter fortiguard

set cache-mode ttl

set cache-prefix-match enable

set cache-mem-percent 2

set ovrd-auth-port-http 8008

set ovrd-auth-port-https 8010

set ovrd-auth-port-warning 58020

set ovrd-auth-https enable

set warn-auth-https enable

set close-ports disable

set request-packet-size-limit 0

set ovrd-auth-hostname ''

set ovrd-auth-cert "Fortinet_Firmware"

end


FG100 # config webfilter fortiguard


FG100 (fortiguard) # set ovrd-auth-port-http 58008


FG100 (fortiguard) # set ovrd-auth-port-https 58010


FG100 (fortiguard) # end


FG100 # show full webfilter fortiguard

config webfilter fortiguard

set cache-mode ttl

set cache-prefix-match enable

set cache-mem-percent 2

set ovrd-auth-port-http 58008

set ovrd-auth-port-https 58010

set ovrd-auth-port-warning 58020

set ovrd-auth-https enable

set warn-auth-https enable

set close-ports disable

set request-packet-size-limit 0

set ovrd-auth-hostname ''

set ovrd-auth-cert "Fortinet_Firmware"

end

X11 packages to support X forwarding on RHEL 7

# yum install "@X Window System"

OR

# yum install xorg-x11-xauth xorg-x11-fonts-* xorg-x11-utils

OBIEE 11g Startup Script

​#!/bin/bash

# File: /etc/init.d/obiee

# Purpose: Start and stop Oracle Business Intelligence 11g components.

# chkconfig: 2345 99 10

# description: Manage OBIEE service.

# These values must be adapted to your environment.


ORACLE_OWNR=obiee11g                                          # Local Unix user running OBIEE

ORACLE_FMW=/opt/app/Middleware11g                      # Deployment root directory

BIEE_USER=weglogic                                                # BIEE administrator name

BIEE_PASSWD=Admin@123                                      # BIEE administrator password

BIEE_DOMAIN=bifoundation_domain1                        # Domain name

BIEE_INSTANCE=instance1                                      # Instance name

BIEE_SERVER=bi_server1                                        # Server name

BIEE_MANAGER_URL=192.168.168.27:7001             # Admin server URL (hostname:port)


# These should require no change.


WL_PATH=$ORACLE_FMW/wlserver_10.3/server/bin

BIEE_PATH=$ORACLE_FMW/user_projects/domains/$BIEE_DOMAIN/bin

ORACLE_INSTANCE=$ORACLE_FMW/instances/$BIEE_INSTANCE


export ORACLE_INSTANCE


START_LOG=/var/log/obiee-start.log

STOP_LOG=/var/log/obiee-stop.log

SUBSYS=obiee


start()

{

echo "********************************************************************************"

echo "Starting Admin Server on $(date)"

echo "********************************************************************************"

su $ORACLE_OWNR -c "$BIEE_PATH/startWebLogic.sh" &

wait_for "Server started in RUNNING mode"

echo "********************************************************************************"

echo "Starting Node Manager on $(date)"

echo "********************************************************************************"

su $ORACLE_OWNR -c "$WL_PATH/startNodeManager.sh" &

wait_for "socket listener started on port"

echo "********************************************************************************"

echo "Starting Managed Server $BIEE_SERVER on $(date)"

echo "********************************************************************************"

su $ORACLE_OWNR -c "$BIEE_PATH/startManagedWebLogic.sh $BIEE_SERVER http://$BIEE_MANAGER_URL" &

wait_for "Server started in RUNNING mode"

echo "********************************************************************************"

echo "Starting BI components on $(date)"

echo "********************************************************************************"

su $ORACLE_OWNR -c "$ORACLE_INSTANCE/bin/opmnctl startall"

echo "********************************************************************************"

echo "OBIEE start sequence completed on $(date)"

echo "********************************************************************************"

}


stop()

{

echo "********************************************************************************"

echo "Stopping BI components on $(date)"

echo "********************************************************************************"

su $ORACLE_OWNR -c "$ORACLE_INSTANCE/bin/opmnctl stopall"

echo "********************************************************************************"

echo "Stopping Managed Server $BIEE_SERVER on $(date)"

echo "********************************************************************************"

su $ORACLE_OWNR -c "$BIEE_PATH/stopManagedWebLogic.sh $BIEE_SERVER t3://$BIEE_MANAGER_URL $BIEE_USER $BIEE_PASSWD"

echo "********************************************************************************"

echo "Stopping Node Manager on $(date)"

echo "********************************************************************************"

pkill -TERM -u $ORACLE_OWNR -f "weblogic\\.NodeManager"

echo "********************************************************************************"

echo "Stopping Admin Server on $(date)"

echo "********************************************************************************"

su $ORACLE_OWNR -c "$BIEE_PATH/stopWebLogic.sh"

echo "********************************************************************************"

echo "OBIEE stop sequence completed on $(date)"

echo "********************************************************************************"

}


wait_for() {

res=0

while [[ ! $res -gt 0 ]]

do

res=$(tail -5 "$START_LOG" | fgrep -c "$1")

sleep 5

done

}


case "$1" in

start)

echo "********************************************************************************"

echo "Starting Oracle Business Intelligence on $(date)"

echo "Logs are sent to $START_LOG"

echo "********************************************************************************"

start &> $START_LOG &

touch /var/lock/subsys/$SUBSYS

;;


stop)

echo "********************************************************************************"

echo "Stopping Oracle Business Intelligence on $(date)"

echo "Logs are sent to $STOP_LOG"

echo "********************************************************************************"

stop &> $STOP_LOG

rm -f /var/lock/subsys/$SUBSYS

;;


status)

echo "********************************************************************************"

echo "Oracle BIEE components status...."

echo "********************************************************************************"

su $ORACLE_OWNR -c "$ORACLE_INSTANCE/bin/opmnctl status"

;;


restart)

$0 stop

$0 start

;;


*)

echo "Usage: $(basename $0) start|stop|restart|status"

exit 1

esac


exit 0